
Removing backgrounds from images in Photoshop is a fundamental skill for designers, photographers, and content creators. Whether you need to isolate a product for e-commerce, create compelling marketing visuals, or simply enhance your photographs, mastering background removal techniques is essential. Photoshop offers a variety of tools to achieve this, ranging from AI-powered automated options to precise manual methods. This guide will explore seven effective techniques for background removal in Photoshop, focusing on when and how to use each tool for optimal results, with a special emphasis on the precision and control offered by the Pen Tool for complex selections and background cropping.
Key Takeaways
- Discover Photoshop’s AI-driven Remove Tool for effortless, one-click background removal, ideal for quick edits.
- Learn to use the Object Selection Tool, powered by Adobe Sensei AI, for intelligent subject detection and automatic background isolation.
- Explore the Quick Action feature for rapid background removal, balancing speed with potential accuracy trade-offs in intricate images.
- Master the Background Eraser Tool for manual background removal, offering precise control for high-contrast images requiring detailed adjustments.
- Delve into the Pen Tool for unparalleled control in separating subjects from complex backgrounds, though demanding more time and skill for precise path creation.
- Understand the Magnetic Lasso Tool for semi-automatic edge detection in high-contrast images, speeding up the selection process for subjects with intricate outlines.
- Utilize the Quick Selection Tool for fast subject selection based on color and texture, allowing for quick refinements and efficient background removal.
1. Instant Background Removal with Photoshop’s AI-Powered Remove Tool
Photoshop’s Remove Tool, introduced in recent versions, leverages the power of artificial intelligence to simplify background removal. This tool is designed for speed and ease of use, allowing for near one-click background removal in many scenarios. It’s particularly effective for images where the subject is clearly defined against the background.
Step-by-Step Guide to Using the Remove Tool
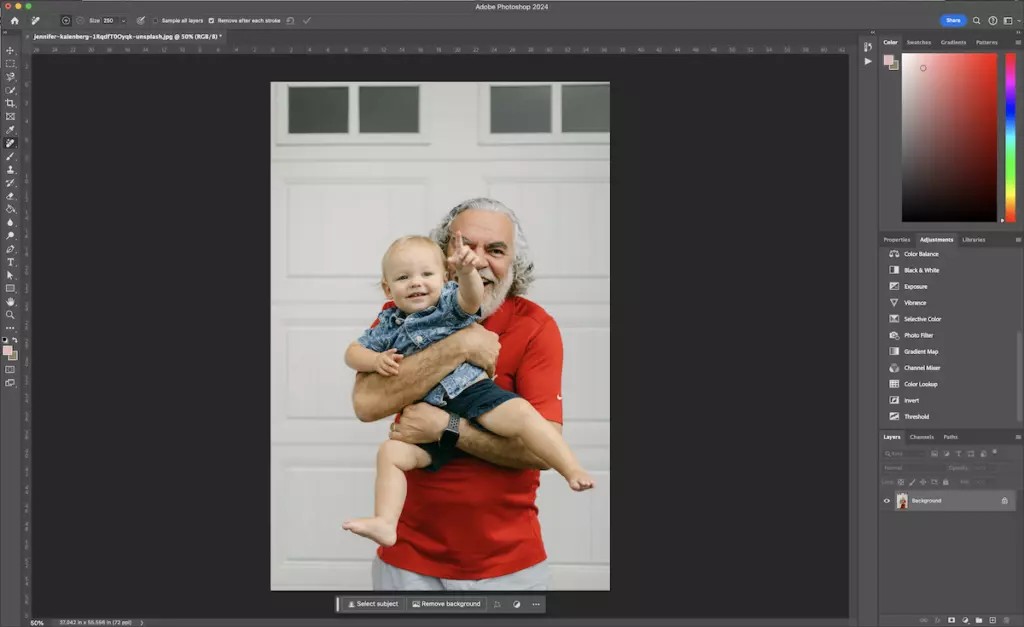
Let’s use this image as an example to demonstrate background removal using the Remove Tool:
- Select the Remove Tool: Locate the “Remove Tool” in the toolbar. It is often grouped with the Spot Healing Brush.
-
One-Click Background Removal: In the options bar below your image, you’ll find the “Remove Background” button. Click this button. Photoshop’s AI will automatically detect and remove the background.
-
Background Removed: Observe as the background is instantly removed, leaving your subject isolated.
- Refine Edges (Optional): For fine-tuning, use the “Subtract from Mask” and “Add to Mask” options available below the image. “Subtract from Mask” helps remove any lingering background elements, while “Add to Mask” restores any accidentally removed parts of your subject.
Tip: For non-destructive editing, duplicate your background layer first. Apply the Remove Tool to the duplicate layer, preserving your original image.
Beyond one-click removal, the Remove Tool also allows for manual refinement. You can “paint” areas you want removed, and the AI intelligently interprets your strokes to refine the selection.
For instance, painting broadly over the background can smooth it out rather than completely removing it, offering creative possibilities for background manipulation.
The Remove Tool is versatile for both background and object removal. For more in-depth information, refer to Adobe’s official documentation: https://helpx.adobe.com/photoshop/using/tool-techniques/remove-tool.html
Photo Credit: Jennifer Kalenberg on Unsplash.
2. Automatic Subject Selection with the Object Selection Tool
The Object Selection Tool, a powerful addition to Photoshop, utilizes Adobe Sensei AI to automatically detect and select subjects within an image. This tool significantly simplifies the process of isolating subjects for background removal and is particularly effective for portraits, product shots, and images with distinct subjects.
Steps to Remove Background Using the Object Selection Tool
-
Select the Object Selection Tool: Open your image in Photoshop and choose the Object Selection Tool from the toolbar on the left. It shares a menu with the Quick Selection Tool.
-
Hover and Select: Hover your cursor over the subject in your image. Wait for the tool to highlight the subject in blue. If it doesn’t highlight immediately, try moving your cursor in small circles over the subject area.
-
Automatic Subject Selection: Photoshop will instantly detect and select the subject, indicated by the “marching ants” selection outline.
-
Select Multiple Objects (Optional): To select multiple objects, press and hold the Shift key while selecting each additional object you want to include in your selection.
-
Inverse the Selection: Go to Select > Inverse to switch the selection from the subject(s) to the background. Now the background is selected for removal.
-
Unlock Background Layer (If Necessary): If your image layer is locked as a “Background” layer, unlock it by clicking the lock icon in the Layers panel. The layer name will change to “Layer 0”.
-
Erase the Background: Select the Eraser Tool, choose a large brush size, and begin erasing the selected background area. The selection ensures you only erase the background and not the subject.
If you need to re-select the subject at any point, simply reactivate the Object Selection Tool and hover over the subject again. Photoshop remembers the selection.
To refine the automatically generated mask from the Object Selection Tool, refer to Adobe’s guide on editing masks: https://helpx.adobe.com/photoshop/using/making-quick-selections.html
Photo credit: Chris Hardy on Unsplash
3. Quick Background Removal using Quick Actions
For situations where speed is paramount and absolute precision is less critical, Photoshop’s Quick Action feature offers an exceptionally fast method for background removal. Introduced in Photoshop 2021 (Creative Cloud subscription), this built-in tool provides an Adobe background remover that prioritizes efficiency. It works best with images that have good contrast between the subject and background and relatively simple subject outlines.
Quick Steps for Background Removal with Quick Actions
-
Duplicate Layer: Open your image in Photoshop, right-click on the “Background” layer, and select Duplicate Layer. Name the new layer (e.g., “Background Removed”) and click OK. Turn off the visibility of the original “Background” layer by clicking the eye icon next to it.
-
Open Properties Panel: Ensure the Properties panel is visible by navigating to Window > Properties. If it’s already checked, it’s open. Otherwise, click to open it; it usually appears on the right side of your workspace.
-
Select Layer and Remove Background: In the Layers panel, select the newly duplicated layer. In the Properties panel, under the Quick Actions section, click the Remove Background button.
- Background Removed with Mask: Photoshop will instantly remove the background, applying a layer mask to the selected layer. The mask hides the background, revealing transparency behind the subject.
- Refine Mask (Optional): For refining the edges of the removed background (e.g., around the dog’s feet in the example image), you can edit the layer mask directly. For guidance on working with masks, consult Adobe’s tutorial: https://creativecloud.adobe.com/en/learn/photoshop/web/layer-mask.
Photo credit: Karsten Wingert on Unsplash
4. Controlled Background Removal with the Background Eraser Tool
The Background Eraser Tool provides a balance between automation and manual control, making it suitable for images where you need more influence over the background removal process than automated tools offer, but without the complete manual path drawing of the Pen Tool. It’s particularly effective for high-contrast images, though achieving refined results may require more time and effort compared to AI-powered tools.
Using the Background Eraser Tool for Background Removal
-
Duplicate Layer: As with previous methods, start by duplicating your “Background” layer. Right-click the Background layer, choose Duplicate Layer, name it, and click OK. Hide the original Background layer.
-
Select the Background Eraser Tool: From the toolbar, select the Background Eraser Tool. It might be nested under the Eraser Tool; click and hold the Eraser Tool to reveal and select the Background Eraser Tool.
-
Brush Settings: In the tool options bar at the top, click the brush icon to access the Brush panel. Set the Hardness to near or at 100% for crisp edges. Adjust the Size to suit your image; starting with 50px is a good general size. You can change the size dynamically using the square bracket keys (
[to decrease,]to increase).
- Sampling and Tolerance: In the tool options bar, set Sampling to Continuous (the first of three icons). Set Limits to Find Edges, and Tolerance to around 20–25%. Lower tolerance values select fewer color variations, while higher values select a broader range.
-
Erase the Background: Begin erasing the background around your subject. The key is to keep the crosshairs at the center of the brush cursor on the background, avoiding contact with the subject’s edges. Zoom in for detail work. Use short brush strokes, releasing the mouse button frequently, to allow for easy undo actions (Ctrl+Z or Cmd+Z) if you erase too far.
-
Adjust Brush Size and Settings: For intricate areas, adjust the brush size using
[and]. If the tool starts erasing your subject, undo (Ctrl+Z or Cmd+Z). Then, in the options bar, change Sampling to Once (the middle icon), Limits to Discontiguous, and reduce Tolerance to around 10%. These settings make the eraser sample color only once, from under the crosshairs, and not resample as you paint, offering more precise control in tricky areas.
The Background Eraser Tool offers a good balance of control and efficiency. For more detailed information, see Adobe’s tutorial: https://helpx.adobe.com/photoshop/using/erasing-parts-image.html#change_pixels_to_transparent_with_the_background_eraser_tool.
Photo credit: Enrique Ortega Miranda on Unsplash
5. Precision Background Cropping with the Pen Tool
The Pen Tool stands out as the most precise method for background removal in Photoshop. It offers unparalleled control over selections, especially for complex shapes and intricate details. While it requires more time and skill compared to automated tools, the Pen Tool provides the cleanest and most accurate results, particularly when you need to crop background Photoshop Pen Tool style, meaning meticulously trace and remove the background using path-based selections.
Step-by-Step Guide to Background Removal Using the Pen Tool
-
Duplicate Layer: Begin by duplicating your “Background” layer to work non-destructively. Right-click the Background layer, choose Duplicate Layer, name it, and click OK. Hide the original Background layer.
-
Select the Pen Tool: Choose the Pen Tool from the toolbar. It’s located above the Text tool. Zoom into your image to start outlining your subject precisely.
-
Create a Path: Click to set the first anchor point on the edge of your subject. Continue clicking around the subject to create anchor points, forming a path. For curved lines, click, hold, and drag to create Bézier curves, adjusting the handles to match the subject’s contours.
For fine-tuning anchor points and curves, use the Direct Selection Tool (nested under the Path Selection Tool). To undo an anchor point, press Ctrl+Z or Cmd+Z.
For a comprehensive guide on the Pen Tool and paths, refer to Adobe’s tutorial: https://helpx.adobe.com/photoshop/using/editing-paths.html.
- Close the Path and Save: Once you’ve traced the entire subject, close the path by clicking on the initial anchor point. To save your path, go to Window > Paths to open the Paths panel. Click the three-bar menu in the Paths panel, choose New Path, and name your path (e.g., “Subject Path”).
- Convert Path to Selection: Right-click on your saved path in the Paths panel and select Make Selection. In the dialog box, keep the default settings and click OK. This converts your path into a selection outline (“marching ants”).
- Inverse Selection and Delete Background: Go to Select > Inverse to select the background instead of the subject. Press the Delete key to remove the background within the selection. You’ll now see a transparent checkerboard pattern where the background was.
While the Pen Tool is powerful, you might need to combine it with other techniques for refining details, especially in areas like hair or fur.
For more detailed guidance on the Pen Tool, explore Adobe’s tutorial: https://helpx.adobe.com/photoshop/using/drawing-pen-tools.html#Pentool.
Photo credit: Kim Carpenter on Unsplash
6. Semi-Automatic Edge Detection with the Magnetic Lasso Tool
If the precision of the Pen Tool feels too time-consuming, or if you prefer a more interactive approach, the Magnetic Lasso Tool offers a semi-automatic method for background removal. It’s particularly useful when the subject has clear, high-contrast edges against the background, allowing Photoshop to “magnetically” snap the selection outline to the edges as you drag the tool.
Using the Magnetic Lasso Tool for Background Removal
-
Duplicate Layer: Duplicate your “Background” layer to work non-destructively. Right-click the Background layer, select Duplicate Layer, name it, and click OK. Hide the original Background layer.
-
Select the Magnetic Lasso Tool: Choose the Magnetic Lasso Tool from the toolbar.
-
Trace the Subject’s Edge: Click to set the starting point on the edge of your subject. Slowly trace along the subject’s outline. The Magnetic Lasso Tool automatically attempts to snap the selection edge to the subject-background boundary. Move your cursor slowly and steadily for best results.
- Close the Selection: Continue tracing around the entire subject until you return to your starting point. Click on the starting point to close the selection. “Marching ants” will appear around your selected subject.
-
Save Selection (Optional): To save your selection for later refinement, go to Select > Save Selection and name it.
-
Inverse Selection and Delete Background: Go to Select > Inverse to select the background. Press the Delete key to remove the background.
If you are not satisfied with the initial selection, you can undo steps (Ctrl+Z or Cmd+Z) and try again, adjusting your tracing speed or starting point. Combining the Magnetic Lasso Tool with other selection or masking techniques can help refine the background removal further.
For more information on the Magnetic Lasso Tool, see Adobe’s tutorial: https://helpx.adobe.com/photoshop/using/selecting-lasso-tools.html#select_with_the_magnetic_lasso_tool.
Photo credit: Dlanor S on Unsplash
7. Fast and Versatile Selection with the Quick Selection Tool
The Quick Selection Tool is often favored for its speed and versatility in selecting subjects for background removal. It works by detecting color and texture differences, allowing you to “paint” over the subject, and Photoshop intelligently expands the selection to encompass the subject based on these differences. It is effective across a range of images, including those with slightly complex edges or “wispy” details, and offers quick refinement capabilities.
Steps for Background Removal with the Quick Selection Tool
-
Duplicate Layer: Begin by duplicating the “Background” layer. Right-click the Background layer, choose Duplicate Layer, name it, and click OK. Hide the original Background layer.
-
Select the Quick Selection Tool: Choose the Quick Selection Tool from the toolbar. It might be located under the Object Selection Tool.
-
Paint to Select the Subject: Start “painting” over the subject with the Quick Selection Tool. As you paint, you’ll see the “marching ants” selection expanding to cover the subject area. Adjust the brush size using the
[(smaller) and](larger) keys to match the size of the areas you’re selecting.
- Refine the Selection: If you accidentally select too much, or need to refine edges, hold down the Option key (macOS) or Alt key (Windows). The tool cursor will change from a
+to a-symbol, indicating it’s now in subtraction mode. Paint over the areas you want to deselect while holding Option/Alt.
-
Save Selection (Optional): Save your selection by going to Select > Save Selection and giving it a name. This allows you to return and make adjustments later if needed.
-
Inverse Selection and Delete Background: To remove the background, go to Select > Inverse to select the background area. Press the Delete key.
If further refinement is needed, you can undo steps, refine the selection using addition or subtraction modes of the Quick Selection Tool, resave the selection, and retry the background deletion.
For more detailed information on the Quick Selection Tool, refer to Adobe’s tutorial: https://helpx.adobe.com/photoshop/using/making-quick-selections.html#select_with_the_quick_selection_tool.
Photo credit: Natural Goods Berlin on Unsplash
Background Removal in Photoshop: Easier Than Ever
Photoshop’s diverse toolkit makes background removal accessible to users of all skill levels. From AI-powered automation for quick tasks to manual precision with tools like the Pen Tool for intricate Cara Crop Photoshop Pen Tool techniques, Photoshop offers methods for every image complexity and desired outcome. Choosing the right tool for the job not only streamlines your workflow but also enhances the quality of your final image.
Remember to save your final images in a format that supports transparency, such as PNG, if you intend to use them without a background in other applications.
FAQs About Removing Backgrounds in Photoshop
How do I remove the background from an image in Photoshop?
To remove a background in Photoshop:
- Open Your Image: Launch Photoshop and open the image.
- Select the Background: Use tools like the Magic Wand, Quick Selection, or Pen Tool to select the background. For complex backgrounds, the Pen Tool offers the most precision.
- Refine Selection: Use “Select and Mask” or “Refine Edge” to improve selection accuracy.
- Remove Background: Press Delete or Backspace to remove the selected background.
- Add New Background (Optional): Add a new layer below and fill with color or image.
- Final Touches: Refine edges with the Eraser Tool or layer masks.
- Save: Save as PNG for transparency.
What tool removes background in Photoshop?
Photoshop offers multiple tools for background removal:
- Remove Tool: AI-powered, for quick removal.
- Object Selection Tool: AI-driven automatic subject selection.
- Quick Action: Fast, one-click background removal.
- Background Eraser Tool: Manual control, good for high-contrast images.
- Pen Tool: Precise path-based selection for intricate backgrounds.
- Magnetic Lasso Tool: Semi-automatic edge detection.
- Quick Selection Tool: Fast, paint-based selection.
The best tool depends on the image and desired precision.
How do I remove the background from a logo in Photoshop?
To remove a logo background:
- Open Image: Open the logo image in Photoshop.
- Select Logo: Use Magic Wand, Quick Selection, or Pen Tool to select the logo precisely.
- Refine Selection: Use “Select and Mask” for smoother edges.
- Inverse Selection: Go to “Select” > “Inverse” to select the background.
- Delete Background: Press Delete to remove the background.
- Save Logo: Save as PNG to preserve transparency.
How do I remove a white background in Photoshop?
To remove a white background:
- Open Image: Open the image with a white background.
- Select Magic Wand Tool: Choose the Magic Wand Tool.
- Adjust Tolerance: Set tolerance in the options bar (start around 32 and adjust).
- Select White Background: Click on the white background.
- Refine Selection (Optional): Use “Select and Mask” to refine edges.
- Delete Background: Press Delete to remove the white background.
- Check for Residual White: Zoom in and erase any remaining white areas.
- Save Image: Save as PNG for transparency.
photoshopPhotoshop Tutorials & Articlesremoving backgrounds