Debadging your car—removing those factory-installed emblems and badges—can dramatically change its look, giving it a cleaner, more streamlined aesthetic. But before you grab just any tool and start prying, understand that this seemingly simple task requires the right approach and, crucially, the right Debadge Car Tool to avoid damaging your vehicle’s paint.
“Is debadging your car really a challenge you are fully prepared to take on yourself?” It’s a valid question! Many car enthusiasts appreciate the personalized touch debadging offers, but the process can quickly turn frustrating if you’re not properly equipped.
If after reading this guide, you decide this is a task best left to professionals, remember that expertise is invaluable. However, for those ready to tackle this DIY project, understanding the right tools and techniques is paramount.
You might be here because you’re curious about how to debadge your car yourself, or perhaps you’re exploring the tools needed to get the job done professionally. This guide is designed for both. We’ll walk you through the process, highlighting the essential debadge car tools at each step, ensuring you’re well-informed, whether you decide to DIY or seek professional help.
What to Expect in This Debadging Guide
This guide will provide a step-by-step walkthrough of the car debadging process. We’ll draw upon years of experience in auto detailing to illustrate each stage, emphasizing the correct tools and techniques for a successful outcome. You’ll also learn about specific debadge car tools that professionals use, many of which are available for DIY enthusiasts wanting to achieve professional-level results.
4 Steps to Successfully Debadge Your Car Using the Right Tools
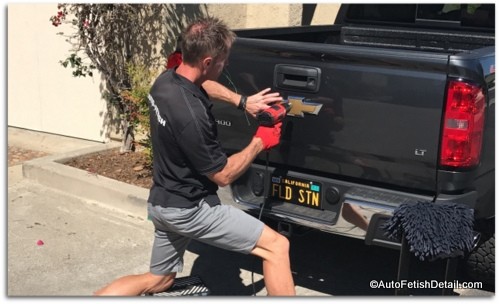
1) Car Badge and Emblem Removal with Precision Tools:
The first step, removing the badges or emblems, can vary in difficulty depending on your car’s age and the adhesive used. Generally, older cars can present a greater challenge. Professionals often use heat guns to gently warm the emblems, softening the adhesive. While dental floss or fishing line can work as basic separation tools, specialized debadge car tools like plastic trim removal tools are designed to slide behind emblems without scratching the paint.
Important Tool Consideration: Using a heat gun requires caution. Overheating can damage your car’s paint. Professional debadge car tool kits often include heat-resistant gloves and temperature-controlled heat guns to mitigate this risk.
2) Double-Sided Tape Removal with an Eraser Wheel:
Most car badges are attached with double-sided tape. Manufacturers use various types, from thin to very thick, making this stage potentially problematic. Without the right debadge car tool, you might resort to scraping, which risks damaging the paint. Adhesive removers like Goo-Gone are often ineffective on thick double-sided tape and can create a messy residue.
The 3M eraser wheel is a game-changer. This specialized debadge car tool, designed for adhesive removal, quickly and safely shreds the tape without harming the paint. Trying to peel the tape by hand is tedious and often incomplete. Using scrapers, especially metal ones, is highly discouraged as they can easily scratch the clear coat.
3) Residual Adhesive Removal with Safe Solvents:
Even after removing the tape, a thin layer of adhesive residue usually remains. Neither an eraser wheel nor manual methods can effectively remove this. This is where specialized adhesive removers, designed to be safe for car paint, become essential debadge car tools.
However, not all adhesive removers are equal. Inferior products require excessive rubbing, which can abrade the paint, especially on darker vehicles. Opt for high-quality adhesive removers formulated for automotive paint and use them with soft microfiber cloths to minimize friction and prevent damage.
4) Polishing the Debadged Area for a Flawless Finish:
Alt text: Polishing the area after debadging a Mercedes, using car polishing tools to achieve a seamless finish.
Polishing is crucial for achieving a truly professional debadged look, regardless of your car’s color. Unless your car is brand new, there will likely be some level of wear or “ghosting” where the badge was. Polishing, either by hand or with a machine polisher, is the final step in using your debadge car tools to perfection.
Even if no visible scratches are made during the debadging process, polishing ensures a uniform finish, removing any subtle imperfections and restoring the paint’s shine. Lighter car colors are more forgiving, but polishing is especially vital for darker paints to eliminate any signs of the debadging process.
Debadging Your Car: Key Takeaways & Tool Focus
In summary, successfully debadging your car hinges on using the correct debadge car tools and techniques. Here are crucial points to consider:
- DIY or Professional?: You can attempt debadging yourself, but understand the potential risks and required tools.
- Inexperience Consequences: Improper techniques and wrong tools can lead to paint damage, costing more in repairs.
- Car Age and Color: Older and darker cars are generally more challenging to debadge cleanly.
- Timing is Key: If you’re considering debadging a new car, doing it sooner rather than later simplifies the process.
- Essential Tools: Invest in quality debadge car tools such as plastic trim removal tools, eraser wheels, automotive adhesive removers, and polishing compounds.
Equipping yourself with the right debadge car tools is not just about making the job easier; it’s about ensuring a professional, damage-free result. Understanding the process and investing in quality tools empowers you to achieve the clean, debadged look you desire.
Hopefully, this guide has provided you with a clearer understanding of the “debadge car” process and the importance of using the right tools. Being an informed car owner allows you to make the best decisions for your vehicle’s care and customization.
Sincerely,
Darren Priest