
CV axles, or Constant Velocity axles, are critical components in your car or truck’s drivetrain, responsible for transferring power from the transmission to the wheels, especially in front-wheel drive and all-wheel drive vehicles. Lifting your vehicle for off-roading, engaging in regular off-road adventures, or simply the passage of time and normal wear and tear can lead to the degradation of your CV axles. One common issue, often indicated by grease leaks, is damage to the CV axle boot. While a torn boot might sometimes be addressed with a Cv Axle Boot Install Tool Car Truck and a new boot, neglecting this issue or experiencing more severe symptoms often necessitates a complete CV axle replacement.
Signs that your CV axle might be failing include:
- Clunking or Clicking Noises: Especially noticeable during turns, this can indicate wear or damage within the CV joint itself.
- Vibrations: Felt through the steering wheel or the chassis, vibrations can point to an imbalanced or damaged axle.
- Grease Leaks: Visible grease on the inside of your wheel or around the CV axle boot signals a torn or damaged boot, leading to potential joint failure if not addressed.
- Binding During Turns: A feeling of resistance or stiffness when turning can be another symptom.
In this guide, we will walk you through the process of replacing a CV axle. While addressing a damaged boot early with a cv axle boot install tool car truck might prevent full axle replacement in some cases, this guide focuses on complete replacement, a necessary repair when the axle is significantly worn or damaged.
Before starting, ensure you have the necessary tools:
- 19mm Socket
- 35mm Socket (check your vehicle’s specification)
- Flat Head Screwdriver
- Hammer
- Pry Bar
- Jack and Jack Stands
- Torque Wrench (highly recommended for proper reassembly)
- Optional: Impact Wrench (for easier nut removal)
Step 1: Vehicle Preparation
Begin by safely lifting the front end of your car or truck using a jack. Securely support the vehicle with jack stands. Safety First: Always use jack stands when working under a vehicle. Remove the wheel and tire from the side you will be working on.
Step 2: Initial Inspection
With the wheel removed, you’ll be looking at the hub and suspension components. Locate the CV axle and its connection to the wheel hub.
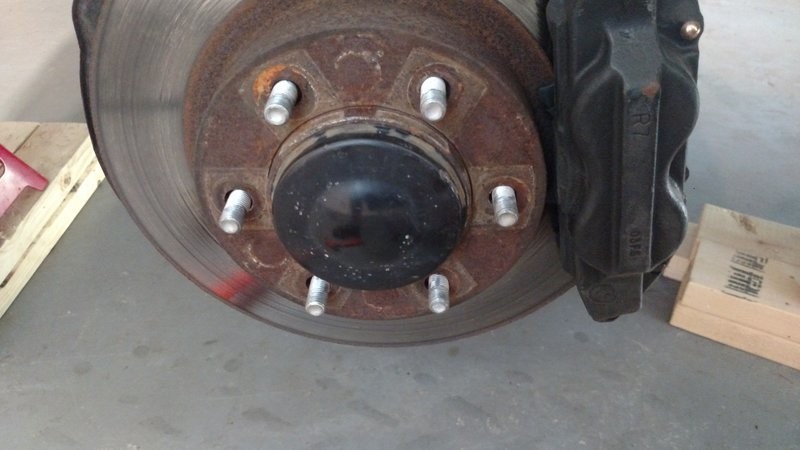 Front suspension and CV axle visible after wheel removal
Step 3: Dust Cap Removal
On the center of the wheel hub, you’ll find a dust cap. This needs to be removed to access the axle nut. Use a flat head screwdriver and hammer to gently pry off the dust cap. Work around the edges to avoid damaging it if you intend to reuse it.
Step 4: Accessing the Axle Nut
Removing the dust cap will reveal the castle nut cover (if present) and the large axle nut itself. The axle nut size is typically 35mm, but always verify the correct size for your specific vehicle make and model.
Step 5: Axle Nut Removal
This nut can be quite tight. You have a couple of options for removal:
- Impact Wrench: An impact wrench (air, cordless, or corded) is the easiest way to remove a stubborn axle nut.
- Breaker Bar and Socket: If you don’t have an impact wrench, use a breaker bar with your 35mm socket. You’ll need someone to hold the brake rotor to prevent it from turning while you apply force to the nut.
Step 6: Disconnecting the Outer Tie Rod
To gain better access and range of motion for CV axle removal, it’s often necessary to disconnect the outer tie rod end. This is a standard ball joint separation process. Loosen the tie rod end nut until it is flush with the end of the bolt (covering 3-4 threads). Then, use a hammer to sharply strike the knuckle near the tie rod end to break the ball joint loose. Avoid damaging the threads. You can also use a ball joint separator tool if available.
Step 7: Detaching the Lower Ball Joint
Locate the two 19mm bolts that secure the knuckle assembly to the lower ball joint. Remove these bolts. This will further loosen the knuckle and provide more room to maneuver the CV axle during removal and installation.
Step 8: Separating the Axle from the Wheel Hub
With the axle nut removed and the knuckle loosened, you can now separate the outer CV axle shaft from the wheel bearing and hub assembly. Sometimes a gentle tap with a hammer on the axle end is sufficient to push it through. If it’s stuck, use a penetrating fluid and a slightly more forceful hammer strike, being careful not to damage the axle threads. Once loose, pull the knuckle assembly out of the way to create space.
Step 9: Removing the Axle from the Differential
Now, focus on the inner end of the CV axle where it enters the front differential (or transaxle). Position your pry bar between the differential housing and the CV axle housing. With a firm and controlled motion, pry the axle outwards. It should pop out of the differential. Be prepared for a small amount of transmission fluid to leak out if you are working on a vehicle where the axle enters directly into the transmission.
Step 10: Reinstallation
Reinstallation is essentially the reverse of the removal process.
- Carefully align the splines of the new CV axle with the differential and gently push it into place until it seats securely. You should feel or hear a click when it’s properly seated. Be extremely careful not to damage the differential seal during insertion.
- Guide the outer end of the axle through the wheel hub.
- Reattach the lower ball joint to the knuckle and tighten the 19mm bolts to the manufacturer’s specified torque.
- Reconnect the outer tie rod end and tighten the nut to the specified torque.
- Install the axle nut and tighten it to the manufacturer’s specified torque. This is a crucial step, and using a torque wrench is highly recommended.
- Reinstall the dust cap.
- Mount the wheel and tire.
- Lower the vehicle.
- Important: After completing the job, it’s advisable to get a wheel alignment, especially if you disconnected suspension components.
Conclusion
Replacing a CV axle is a manageable DIY task for those with basic mechanical skills and the right tools. Remember to always prioritize safety, use proper tools, and consult your vehicle’s repair manual for specific torque specifications and procedures. While this guide focuses on full replacement, remember that regular inspection of your CV axle boots and timely repair using a cv axle boot install tool car truck when only the boot is damaged can potentially prolong the life of your CV axles and prevent more extensive repairs down the road. If you are unsure about any step, it’s always best to consult a professional mechanic.
