In network troubleshooting, the ping utility is invaluable for verifying network reachability and diagnosing connectivity issues. Cisco Meraki devices offer integrated ping tools accessible directly from the dashboard, but their functionality varies across different platforms. This article provides a detailed overview of how to effectively use the ping tools utility within the Meraki ecosystem, ensuring optimal network management and diagnostics.
Meraki offers two primary ping tools: a live ping tool for testing client reachability and a device ping tool for assessing the connectivity of the Meraki device itself from Meraki Dashboard services. Understanding the nuances of each tool across different Meraki platforms—MX Security Appliances, MS Switches, MR Access Points, MG Cellular Gateways, and MV Cameras—is crucial for network administrators.
Locating the Ping Tool Across Meraki Platforms
The location of the ping tool within the Meraki dashboard is consistent across device categories, residing within the ‘Tools’ section of the device’s status page. Here’s a platform-specific guide to quickly navigate to the ping utility:
- MX Security & SD-WAN Appliances: Navigate to Security & SD-WAN > Monitor > Appliance status > Tools.
- MS Switches: Go to Switching > Monitor > Switches, select a specific switch, and then find Tools.
- MR Access Points: Access the tool via Wireless > Monitor > Access points, select an access point, and click on Tools.
- MG Cellular Gateways: Locate it under Cellular Gateway > Monitor > Cellular Gateways, choose a gateway, and select Tools.
- MV Cameras: For cameras, the path is Cameras > Monitor > Cameras, select a camera, and then navigate to the Network tab to find the ping tool.
Utilizing the Live Ping Tool for Reachability Testing
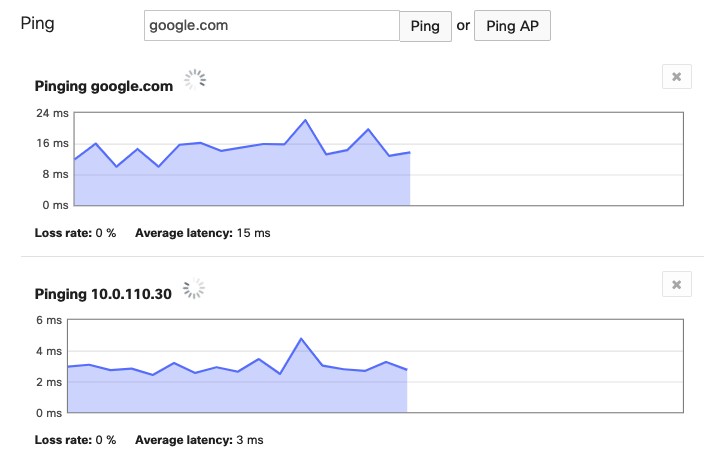
To initiate a ping test from a specific Meraki device, navigate to the ‘Tools’ section as outlined above. Within the ‘Ping’ tool interface, you’ll find a field to enter a destination value. This can be an IP address, a DNS hostname, or, in the case of MX devices, even a client MAC address. After entering the destination, click the ‘Ping’ button to commence the test.
The results are displayed in real-time, showing vital statistics such as the percentage of packet loss and average latency. A dynamic graph visualizes the latency fluctuations throughout the test duration, providing a clear picture of network performance.
A 100% packet loss result typically indicates a failure in either reaching the destination or receiving a response. This could stem from network configuration issues, destination inaccessibility, or firewall restrictions.
MX Security Appliance Ping Tool: Advanced Options and Behaviors
The MX Security Appliance ping tool is the most versatile, accepting IP addresses, DNS hostnames, and client MAC addresses as targets.
Important Note on MAC Addresses: Inputting a client MAC address does not initiate an ARP ping. Instead, the MX attempts to resolve the MAC address to an IP address using its ARP table and then performs a standard IP ping.
MX Ping Tool Behavior: Firmware Version Matters
The behavior of the MX ping tool, particularly concerning the source IP address, is dependent on the firmware version running on the appliance.
Firmware MX 15.11 and Earlier
On MX appliances running firmware version MX 15.11 or older, the source IP address for ping tests is automatically selected as the VLAN interface IP with the highest VLAN ID. In VPN scenarios, the source IP is the VLAN interface IP of the highest VLAN ID participating in the VPN.
Firmware MX 15.12 and Later: Source IP Selection
Firmware version MX 15.12 and newer introduces enhanced ping tool functionality with the addition of a source IP address selection dropdown menu. This allows administrators to specify the source IP for initiating ping tests, providing greater control and diagnostic precision.
Source IP Address Options in MX 15.12+ Firmware:
-
Default: The MX appliance intelligently selects the source IP address based on the routing table, choosing the IP closest to the destination.
- LAN Example: Pinging a device within VLAN A will source the ping from the MX’s VLAN A interface IP.
- Site-to-site VPN Example: For destinations across a site-to-site VPN, the source IP is the VLAN interface IP of the highest VLAN ID involved in the VPN.
- Internet Example: Pinging internet destinations utilizes the configured primary WAN uplink IP as the source.
-
Internet #: This option allows you to select a specific WAN IP address as the source. The ping traffic still adheres to the standard routing rules for LAN clients.
-
VLAN #: Selecting a VLAN interface IP as the source will use that VLAN’s IP. Ping traffic will follow the same routing as clients on that VLAN.
Important Considerations for VLAN Source Interface:
Selecting a VLAN source interface will bypass the MX appliance’s NAT. Consequently, pings to WAN destinations like 8.8.8.8 or google.com will typically result in 100% packet loss as they cannot traverse NAT.
In scenarios where VLANs are disabled on an MX in routed mode, the LAN source interface will be labeled “VLAN 0”.
MX in Passthrough Mode
When an MX appliance operates in passthrough mode (e.g., as a one-armed VPN concentrator), the source IP for ping tests generally defaults to the MX’s WAN interface IP.
MS Switch Ping Tool: Layer 2 and Layer 3 Considerations
The MS switch ping tool supports IP addresses and DNS hostnames as destination values. The source IP selection is determined by the switch’s layer configuration.
- Layer 2 Only Configuration: If the MS switch or stack is configured solely for Layer 2 switching, pings originate from the switch’s management interface.
- Layer 3 Routing Configuration: In Layer 3 configurations, pings are sourced from the specified Layer 3 interface selected in the dropdown menu.
MR Access Point and MV Camera Ping Tools: Management Interface Source
For MR access points and MV cameras, the ping tool functionality is consistent, accepting IP addresses and DNS hostnames. Pings from these devices are always sourced from their respective management interfaces.
Specific Behavior for MR Access Points:
An interesting behavior to note with MR access points is when pinging a wireless client connected to the same AP. In such cases, the ping traffic flows directly between the AP and the wireless client, irrespective of the VLAN configured for the SSID. This direct path simplifies troubleshooting connectivity issues for local wireless clients.
Conclusion
Mastering the Meraki ping tools utility is essential for effective network diagnostics and management. Understanding the platform-specific behaviors and source IP options, especially on MX appliances, allows network administrators to accurately assess reachability, troubleshoot connectivity problems, and maintain optimal network performance. By leveraging these built-in tools, Meraki users can efficiently monitor and manage their network infrastructure.