OmegaT is a powerful, free, and open-source Computer-Assisted Translation (CAT) tool that can significantly streamline your translation workflow. Unlike some of the more expensive, proprietary CAT tools on the market, OmegaT offers a robust set of features without any cost, making it an excellent choice for both freelance translators and language service providers. This guide will walk you through the basics of how to use OmegaT, from setting up a new project to exporting your translated documents.
While some translators might be more familiar with tools like SDL Trados, Wordfast, or MemoQ, OmegaT provides a user-friendly interface and efficient workflow, especially for projects that don’t require handling a wide array of complex file formats. Its simplicity and accessibility make it a great starting point for anyone new to CAT tools, while its functionality is sufficient for even experienced translators looking for a cost-effective solution.
OmegaT boasts a straightforward interface and a simple workflow. While it might not support as many file types as some paid CAT tools, it handles common formats effectively. Its key advantages are being free, open-source, and surprisingly powerful for its price point.
So, how exactly do you translate using OmegaT? If you haven’t already, download OmegaT here. The installation process is generally quick and easy, without needing any special configurations.
Using OmegaT for your translation projects is quite simple. Here’s a breakdown of the workflow:
Creating a New Project
To start a new project, navigate to Project – New in the menu. This will open a window where you can define your project settings.
Here, you’ll need to choose where your translation project folder will be located. For example, you might decide to save it on your D: drive under a folder named Technical – Client A. After selecting your desired location and folder name, click Save.
If you now open Windows Explorer, you’ll find a new folder named Technical – Client A on your D: drive. This folder is currently empty as we haven’t yet imported and processed any files for translation.
Customizing Project Preferences
Next, the project preferences window will appear, allowing you to customize your project settings:
In this window, you can adjust several options, including:
- Language pairs: Define your source and target languages for the translation project.
- Segmentation rules: Choose how OmegaT should segment the text (by sentence or paragraph).
- Tag handling: Configure how OmegaT deals with tags within the documents.
Once you’ve adjusted these preferences to your liking, click OK.
Importing Files for Translation
After setting up your project preferences, a new window will pop up prompting you to import the files you want to translate:
Navigate to the directory where your translation files are stored. Select the file you wish to translate and click Open. OmegaT allows you to import multiple files at once. If you have several files for translation, simply repeat this step for each file, even if they are located in different directories.
If all your files are in the same directory, you can use Ctrl + A to select all of them, or Ctrl + click to select specific files if you only need to translate a subset of files from a directory.
OmegaT also offers the ability to import articles directly from Wikipedia. To do this, click on Download MediaWiki Page….
Copy and paste the URL of the Wikipedia content you want to translate.
Paste the link to the Wikipedia content you wish to translate and then click Close. The content will be imported into OmegaT and ready for translation.
Starting the Translation Process
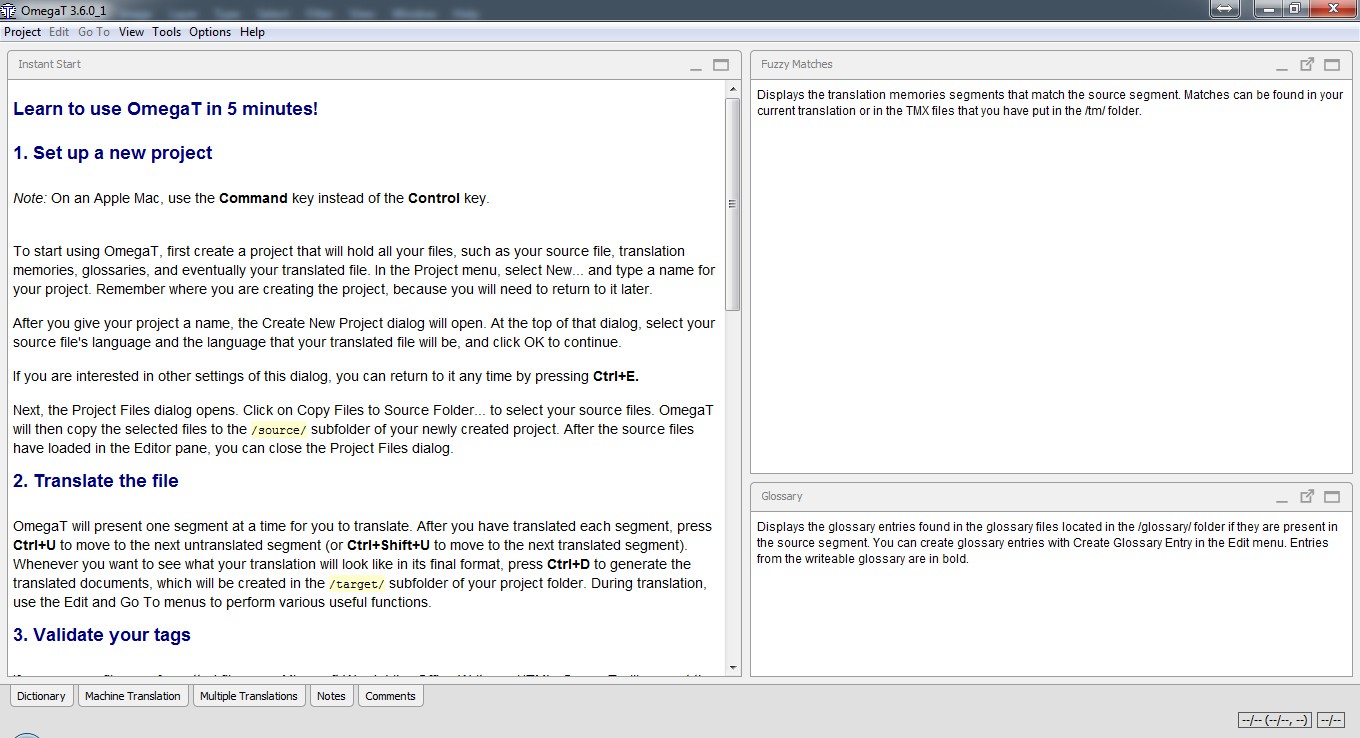
The OmegaT translation interface looks like this:
As you can see in the image, the panel on the left is your main workspace. The panel on the top right is the Fuzzy Matches panel. This panel displays a list of translation memories (TM) that OmegaT has stored. If a segment you are about to translate is similar to or exactly the same as a previously translated segment, it will appear in this panel. You can then insert this previous translation into your current segment, saving you from re-translating or copying and pasting from earlier segments.
The bottom right panel is the Glossary panel. Here, you can view glossaries that you have created or that have been provided by clients. Glossaries are used to ensure consistency in your translations, especially with terminology.
How do you actually translate in OmegaT?
In the workspace panel on the left, you’ll see segments highlighted in green, with an identical segment below them. The green segment is the source text (original language), and the segment below is where you input your translation. To translate, simply delete the words or sentences in the lower segment (but be careful not to delete the tags).
Tags, which appear in grey like , , etc., are programming strings that define formatting in the original document or text. These tags represent functions like bold, italic, superscript, kerning, spacing, text color, and more. If you delete these tags, the original formatting of your translated document will be lost. For instance, text that was originally bolded might not be bolded in the final translated document.
Tag Handling in OmegaT
After you finish translating a segment, you can move to the next segment by pressing Ctrl + U. For a complete list of shortcuts in OmegaT, you can go to the Go To menu.
Exporting Your Translation
Once you have translated all the text segments in your document, it’s time to export the translated document back to its original format. To export your translated document in OmegaT, simply click on Project – Save translated document. That’s it! You can find your translated document in the project folder you specified at the beginning (e.g., D:Technical – Client A).
To be continued…