
Microsoft Windows provides several ways to capture what’s on your computer screen. While you can use the PrtScn key for a full-screen capture or Alt + PrtScn for the active window, Windows also offers a more flexible tool called Snipping Tool. Available since Windows Vista, Snipping Tool allows you to freely select and capture any part of your screen.
Unlike simple keyboard shortcuts, Snipping Tool gives you the power to precisely choose the area you want to capture. Once you’ve snipped your desired image, you can save it in various formats like .png, .jpeg, .gif, or Single File HTML. Here’s how to effectively use the Snipping Tool utility:
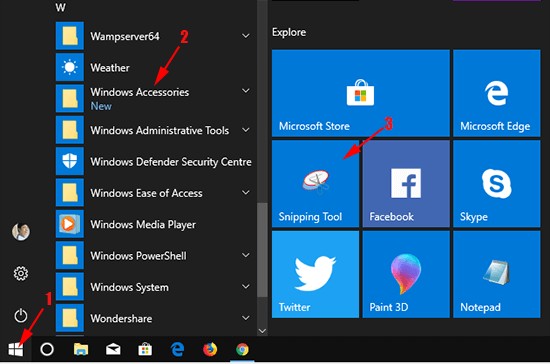
First, access the Snipping Tool application. Click on the Start Menu button located in the bottom left corner of your screen (1). Navigate to Windows Accessories in the menu, where you will find the Snipping Tool application (2). Alternatively, if you have pinned Snipping Tool to your Start Menu as a tile, simply click on the application tile (3).
Once Snipping Tool is open, you are ready to take a snip. To start capturing an image, click the New button.
You’ll notice your screen dimming, indicating that you can now select the area you wish to capture using your mouse.
Drag your cursor to select the specific area of the screen you want to capture. The selected area will then appear in the Snipping Tool window. If you are not satisfied with your selection, you can click the New button again to retry. To save your captured snip, click on the File menu (1) and select Save As… (2).