
Adobe Photoshop offers a suite of Pen tools, each designed to cater to different user needs and creative styles. This guide will explain how to use the Pen Tool Photoshop CS3, covering the various types and their applications for precise image editing and graphic design.
According to Adobe Photoshop documentation and expert tutorials from Photoshop Cafe, the Pen Tool is essential for creating precise selections, paths, and shapes. Understanding how to effectively use it is crucial for mastering Photoshop CS3.
Types of Pen Tools in Photoshop CS3
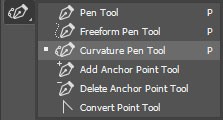
Photoshop CS3 includes several Pen Tool variations, each with unique functionalities:
- Curvature Pen Tool: This intuitive tool is designed for drawing smooth curves and straight segments effortlessly. It simplifies the process of creating organic shapes and precise paths for selections or design elements.
- Standard Pen Tool: Also known as the classic Pen Tool, it provides high precision for drawing straight and curved segments. It is ideal for users who need meticulous control over anchor points and path direction.
- Freeform Pen Tool: Mimicking the natural feel of drawing with a pencil, this tool automatically adds anchor points as you draw. It’s perfect for quick, gestural path creation and is easily adjustable post-drawing.
- Magnetic Pen Option: This option, within the Freeform Pen Tool, allows paths to snap to the edges of defined areas in an image. It’s useful for quickly tracing objects with well-defined boundaries, allowing for adjustments to snapping range and path complexity.
- Content-Aware Tracing Tool: Introduced in later versions of Photoshop, but conceptually relevant, this tool automates image tracing. While not in CS3, understanding its function highlights the evolution of path creation in Photoshop.
These tools can be used independently or in combination with Shape Tools to construct complex designs and selections.
Drawing Straight Lines with the Pen Tool
The simplest path to create with the Standard Pen Tool is a straight line. Here’s how to draw straight lines using the Pen Tool in Photoshop CS3:
- Select the Pen Tool. Choose the Standard Pen Tool from the toolbar.
- Set the First Anchor Point. Position the Pen Tool where you want the line to begin and click once. Do not drag. This sets your first anchor point.
- Set the Second Anchor Point. Move the Pen Tool to where you want the straight line to end.
- Create the Segment. Click again to set the second anchor point. Photoshop will draw a straight line segment connecting the two points.
- Continue Drawing (Optional). Continue clicking to add more anchor points and create connected straight line segments.
- Complete the Path. To finish:
- Close the Path: Hover the Pen Tool over the first anchor point. A small circle will appear next to the pen icon. Click to close the path, creating a closed shape.
- Leave Path Open: Press
Ctrl-click(Windows) orCommand-click(Mac OS) anywhere outside the path, or select a different tool from the toolbar to leave the path open-ended.
Drawing Curves with the Pen Tool
Creating curves involves manipulating anchor points and direction lines. Here’s a step-by-step guide on how to draw curves with the Pen Tool Photoshop CS3:
- Select the Pen Tool. Ensure the Standard Pen Tool is selected.
- Set the Starting Anchor Point and Drag. Position the Pen Tool where the curve should begin, then click and hold the mouse button. Drag to create direction lines that shape the curve, then release the mouse. The length and direction of these lines determine the curve’s shape.
- Set the Next Anchor Point and Drag. Position the Pen Tool where the curve should end. Click and drag again to create new direction lines, shaping the curve segment between the first and second anchor points. Drag in the direction you want the curve to bend.
- Continue Drawing Curves. Repeat step 3 to create a series of connected curves. Place anchor points at points where a curve changes direction, not at the peak of the curve.
- Refine Curves. Adjust the shape of curves by manipulating the direction lines of anchor points using the Direct Selection Tool (A).
- Complete the Path. To finish:
- Close Path: Position the Pen Tool over the initial anchor point until a small circle appears, then click or drag to close the path.
- Leave Path Open:
Ctrl-click(Windows) orCommand-click(Mac OS) away from the path or select another tool.
Using fewer anchor points results in smoother curves. Too many points can create unwanted bumps and irregularities. Practice placing anchor points widely spaced and refining curves using direction lines.
Understanding Curve Direction
-
C-Curves: To create a C-shaped curve, drag the direction lines opposite to the direction of the previous curve.
-
S-Curves: For an S-shaped curve, drag the direction lines in the same direction as the preceding curve.
Conclusion
Mastering the Pen Tool in Adobe Photoshop CS3 opens up a world of precision in image editing and graphic design. Whether you’re drawing straight lines or complex curves, understanding the function of anchor points and direction lines is key. Practice these techniques to enhance your Photoshop skills and achieve professional-level results in your projects. The Pen Tool is a cornerstone of Photoshop proficiency, making it an invaluable skill for any digital artist or photo editor.