Adobe Photoshop offers a variety of Pen tools, each tailored to different user needs and creative styles. This guide will explain how to effectively use the Pen Tool in Adobe Photoshop to enhance your image editing and graphic design projects.
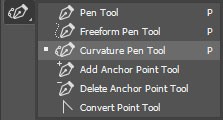
According to Adobe’s official website, the Pen Tool is a powerful feature for creating precise paths and selections. Here are the primary types of Pen Tools available in Photoshop:
- Curvature Pen Tool: This tool is designed for intuitively drawing curves and straight segments. It simplifies the process of creating organic shapes and accurate paths, making it ideal for designers who need flexibility and ease of use.
- Standard Pen Tool: Known for its high precision, the Standard Pen Tool allows users to draw straight and curved segments with meticulous control. It is the go-to tool for creating sharp lines and defined shapes, essential for detailed design work.
- Freeform Pen Tool: Mimicking the feel of drawing with a pencil on paper, the Freeform Pen Tool automatically adds anchor points as you draw. This tool is perfect for creating loose, hand-drawn paths and is easily adjustable after the path is complete.
- Magnetic Pen Tool (Option): This option is designed to snap paths to the edges of defined areas within an image. Users can adjust the range and sensitivity of the snapping feature, as well as the complexity of the resulting path, making it useful for quick selections around objects with clear boundaries.
- Content-Aware Tracing Tool: Aimed at automating image tracing, the Content-Aware Tracing Tool simplifies and speeds up the process of converting raster images into vector paths. This is particularly useful for tasks like isolating objects or creating vector graphics from photos.
The versatility of the Pen Tool extends to its combination with Shape Tools, enabling the creation of complex and intricate designs.
Drawing with the Pen Tool
Typically, the Standard Pen Tool is used to start creating paths from scratch. The method involves placing points and manipulating them to form the desired shapes. Dragging the Pen Tool while creating points allows you to shape curves directly as you draw.
To achieve smooth paths, it’s important to use as few points as possible. Overly complex paths with too many points can result in jagged, less refined curves.
How to Draw Straight Lines with the Pen Tool
Creating straight lines is the most straightforward application of the Standard Pen Tool.
To draw straight lines:
- Select the Pen Tool from the toolbar.
- Position the Pen Tool in your desired starting area and click once to set the first anchor point. Do not drag.
- Click again at the location where you want the straight segment to end. This will create a straight line between the first and second points.
- Continue clicking to add more anchor points for additional straight segments. Each click extends the line from the last point.
- Note Anchor Point Appearance: The most recently added anchor point will appear as a solid square, indicating it is selected. Previously placed anchor points will appear hollow, showing they are not currently selected.
- Completing the Path:
- To close the path: Hover the Pen Tool over the initial anchor point. A small circle will appear next to the pen cursor when you are correctly positioned. Click or drag to close the path, creating a closed shape.
- To leave the path open: Ctrl-click (Windows) or Command-click (Mac OS) anywhere away from the object. Alternatively, you can simply select a different tool from the toolbar to stop drawing and leave the path open.
How to Draw Curves with the Pen Tool
Creating curves with the Pen Tool involves adding anchor points where the curve changes direction and dragging direction lines to shape the curve. The length and angle of these direction lines determine the curve’s form.
Curves are easier to edit and render more efficiently when created with fewer anchor points. Excessive points can lead to unwanted bumps and irregularities in the curve. It’s best to place anchor points widely and refine the curve by adjusting the length and angle of the direction lines.
To draw curves:
- Select the Pen Tool.
- Position the Pen Tool where you want the curve to begin. Press and hold the mouse button. The first anchor point will appear, and the pen cursor will change to an arrowhead.
- Drag to adjust the curve’s slope as desired, then release the mouse button. Generally, extend the direction lines about one-third of the distance toward where you plan to place the next anchor point. These lines can be adjusted later from either side.
- Position the Pen Tool where you want the curve to end.
- Continue dragging the Pen Tool from different locations to create a series of smooth curves. Remember to place anchor points at the start and end of each curve, not at the apex.
- Completing the Path:
- To close the path: Position the Pen Tool over the first (hollow) anchor point. A small circle will appear beside the Pen Tool cursor when you are correctly positioned. Click or drag to close the path.
- For an open path: Ctrl-click (Windows) or Command-click (Mac OS) anywhere on the object, or select a different tool.
Consider the following visual aids to understand curve creation:
A: Pen Tool Position, B: Start Dragging by pressing the mouse, C: Drag to extend direction lines.
To create a C-shaped curve, drag in the opposite direction of the previous direction line, then release the mouse.
To create an S-shaped curve, drag in the same direction as the previous direction line, and then release the mouse.
Mastering the Pen Tool in Adobe Photoshop opens up a world of possibilities for precise selections, detailed masking, and creating vector graphics. By understanding the different types of Pen tools and practicing the techniques for drawing straight lines and curves, you can significantly enhance your Photoshop skills and achieve professional-level results in your digital artwork.