
Adobe Photoshop offers a suite of Pen tools, each designed to cater to different user needs and creative styles. Understanding how to use these tools is fundamental for precise selections, creating vector graphics, and intricate image manipulation. This guide will walk you through the various Pen tools available in Photoshop and explain how to effectively use them to create both straight and curved paths.
According to Adobe Photoshop documentation and Photoshop Cafe tutorials, here’s a breakdown of the Pen tools and how to use them:
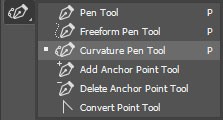
Types of Pen Tools in Photoshop
Photoshop provides several Pen Tool options, each with unique functionalities:
-
Curvature Pen Tool: This tool is designed for intuitively drawing curves and straight segments. It simplifies the process of creating organic shapes and precise paths, making it excellent for both design work and refining image selections.
-
Standard Pen Tool: The classic Pen Tool offers high precision for drawing straight and curved segments. It’s the go-to for users who need meticulous control over anchor points and path direction.
-
Freeform Pen Tool: Mimicking the action of drawing with a pencil on paper, the Freeform Pen Tool automatically adds anchor points as you draw. This is ideal for creating loose, hand-drawn paths and can be adjusted after the path is complete.
-
Magnetic Pen Tool (Option): This option, often found within the Freeform Pen Tool, allows paths to snap to the edges of defined areas in an image. You can adjust the snapping range, sensitivity, and complexity of the resulting path, making it useful for quick selections around objects with well-defined edges.
-
Content-Aware Tracing Tool: A more automated option, the Content-Aware Tracing Tool streamlines the process of tracing images. It uses Photoshop’s content-aware technology to intelligently create paths based on image content, saving time on complex selections.
These Pen Tools can be used independently or combined with Shape Tools to construct complex shapes and designs.
Drawing Straight Lines with the Pen Tool
Creating straight paths is the most straightforward application of the Standard Pen Tool. Here’s how to draw straight lines:
- Select the Pen Tool: Choose the Standard Pen Tool from the toolbar.
- Set the First Anchor Point: Position the Pen Tool where you want the line to begin and click once. Do not drag. This sets your first anchor point.
- Set Subsequent Anchor Points: Click again at the desired location for the line to end. This creates a straight segment. Continue clicking to add more segments and extend your straight path.
- Anchor Point Appearance: The last anchor point you add will appear as a solid square, indicating it’s selected. Previously set anchor points will be hollow, showing they are not currently selected.
- Completing the Path:
- Close the Path: To create a closed shape, hover the Pen Tool over the first anchor point. A small circle will appear next to the pen cursor when you are correctly positioned. Click or drag to close the path.
- Leave Path Open: To leave the path open, simply Ctrl-click (Windows) or Command-click (Mac OS) anywhere outside the object area. Alternatively, you can select a different tool from the toolbar to end the path creation.
Drawing Curves with the Pen Tool
Creating curves involves manipulating anchor points and direction lines to shape the path. Here’s how to draw curves effectively:
- Select the Pen Tool: Ensure the Standard Pen Tool is selected.
- Start the Curve: Position the Pen Tool where you want the curve to begin and click and hold the mouse button. The first anchor point appears, and the cursor changes to an arrowhead.
- Drag Direction Lines: Drag the mouse to adjust the direction and length of the curve. Direction lines determine the shape of the curve. Release the mouse button when you are satisfied with the curve’s initial direction. Generally, extend the direction lines about one-third of the distance to where you plan to place the next anchor point. You can adjust these lines later.
- Continue the Curve: Position the Pen Tool where you want the curve to end or change direction.
- Drag to Shape the Curve: Click and drag from this new point to create the next segment of the curve. Continue dragging from different locations to create a series of smooth curves. Remember to place anchor points at the start and end of each curve segment, not at the curve’s apex.
- Completing Curved Paths:
- Close the Path: To close the path, position the Pen Tool over the first (hollow) anchor point. A small circle will appear next to the cursor. Click or drag to close the curve.
- Leave Path Open: To leave the path open, Ctrl-click (Windows) or Command-click (Mac OS) anywhere outside the object or select a different tool.
Tips for Smooth Curves:
- Fewer Anchor Points: Using fewer anchor points generally results in smoother paths. Overly complex paths with too many points can create unwanted bumps and irregularities in curves.
- Well-Spaced Points: Place anchor points strategically at wide intervals and focus on shaping curves using the length and angle of the direction lines.
- Practice: Mastering the Pen Tool takes practice. Experiment with different types of curves and paths to develop your skill and precision.
Conclusion
The Pen Tool in Photoshop is a powerful asset for precise image editing and graphic design. Whether you need to create clean, straight lines or flowing curves, understanding the different Pen Tool options and mastering the techniques for drawing paths will significantly enhance your Photoshop capabilities. Start with simple shapes and gradually work towards more complex designs to truly unlock the potential of the Path Tool in your creative projects.