Are you eager to dive into the world of digital design with Adobe Illustrator? That’s fantastic! Knowing how to navigate its tools is your first step to creating stunning visuals. Adobe Illustrator stands out as a vector graphics editor, perfect for crafting everything from crisp logos to intricate illustrations. If you’re just starting your Illustrator journey, understanding the essential tools and their functions is crucial. Let’s explore some key tools, with a special focus on one of the most intuitive selection tools: the Magic Wand Tool.
1. Direct Selection Tool (A)
Think of the Direct Selection Tool as your precision pointer. While it shares basic selection capabilities with the regular Selection Tool, it offers finer control. It allows you to select individual anchor points or paths within an object. This is incredibly useful for tweaking shapes and making detailed adjustments to your designs.
You’ll likely find yourself reaching for this tool frequently as you refine your artwork. The shortcut “A” on your keyboard will quickly switch you to the Direct Selection Tool.
2. Magic Wand Tool (Y)
Now, let’s spotlight the Magic Wand Tool. This tool is your go-to for quickly selecting areas in your artwork that share similar attributes, such as color, fill, stroke weight, or opacity. Imagine you have a complex illustration and need to change the color of all the blue elements. Instead of selecting each element individually, the Magic Wand Tool lets you select one blue area, and it automatically picks up all other areas with a similar color!
In the image above, you can see how the Magic Wand Tool has selected all parts of the lightbulb with similar colors and shades. Once selected, you can perform various actions like moving, deleting, or modifying these selected areas all at once.
How to Use the Magic Wand Tool:
- Activate the Tool: Select the Magic Wand Tool from the toolbar (it looks like a wand with sparkles) or simply press “Y” on your keyboard.
- Select by Attribute: In the Properties panel (Window > Properties), you’ll see options to customize what the Magic Wand Tool selects. You can choose to select by Fill Color, Stroke Color, Stroke Weight, Opacity, or Blending Mode.
- Click to Select: Click on an area of your artwork with the attribute you want to select. For example, if you want to select all red areas, ensure “Fill Color” is selected in the Properties panel, and then click on a red object.
- Adjust Tolerance (Optional): The “Tolerance” setting in the Properties panel determines how similar attributes need to be for the Magic Wand to select them. A lower tolerance means the tool will be more precise and select only very similar attributes. A higher tolerance will select a broader range of attributes. Experiment with this setting to fine-tune your selections.
- Modify Selection: Once you’ve made a selection, you can add to or subtract from it by holding down Shift (to add) or Alt/Option (to subtract) while clicking with the Magic Wand Tool.
Use Cases for the Magic Wand Tool:
- Color Adjustments: Quickly change the color of all elements with a specific shade in your design.
- Background Removal: Select and remove backgrounds that have a relatively consistent color.
- Style Consistency: Ensure all elements with a particular stroke weight or opacity are consistently styled.
- Efficiency in Complex Artwork: Save time selecting multiple similar objects in intricate designs.
3. Lasso Tool (Q)
Similar to the Magic Wand Tool, the Lasso Tool is also used for making selections. However, the Lasso Tool provides freehand selection capabilities. It allows you to draw a freeform selection outline around the area you want to select.
As demonstrated above, only the part of the image enclosed within your freehand lasso selection is chosen.
4. Pen Tool (P)
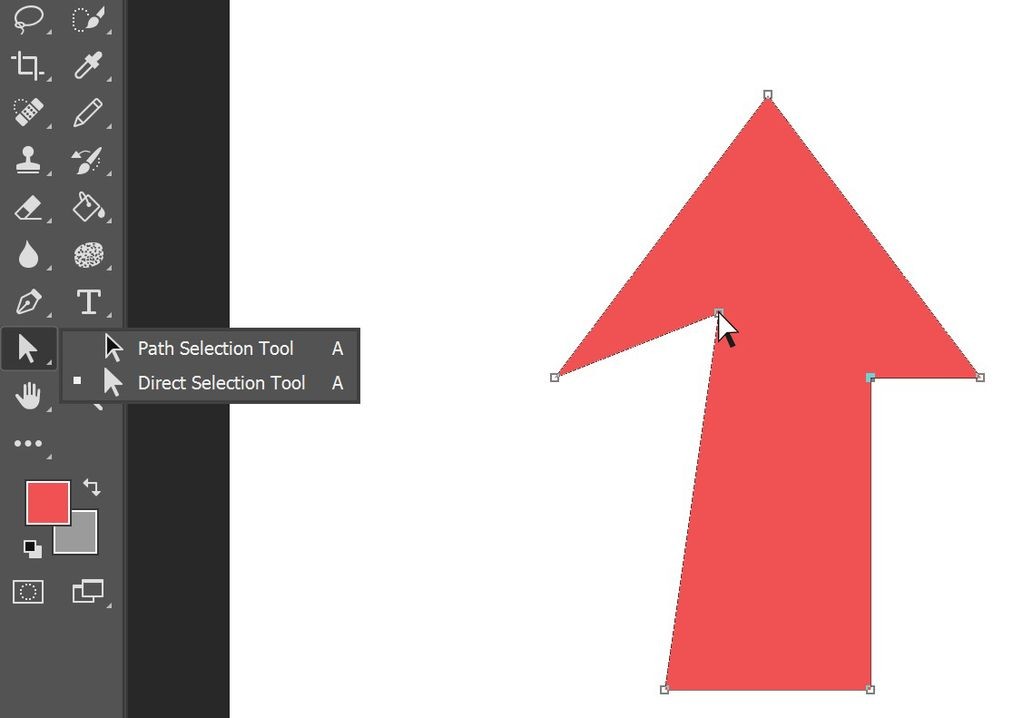
The Pen Tool is a cornerstone of vector graphics. It’s used to create precise paths and shapes by placing anchor points and connecting them with lines. You can create straight lines or smooth curves, giving you immense control over shape creation. Paths can be closed to form shapes or left open as lines.
In this example, a triangle is formed by connecting lines and anchor points. Closing the path by connecting back to the starting point would create a closed shape like a rectangle.
Within the Pen Tool group, you’ll also find:
- Add Anchor Point Tool (+): Adds more anchor points to existing paths for finer adjustments.
- Delete Anchor Point Tool (-): Removes anchor points to simplify paths.
- Anchor Point Tool (Shift+C): Converts smooth anchor points to corner points and vice versa, altering curve segments.
5. Type Tool (T)
The Type Tool is essential for adding text to your designs. You can create various text elements, from large blocks of paragraph text to short lines for headings or brand names.
Illustrator offers several variations of the Type Tool:
- Area Type Tool: Fills text within a closed path or shape. Click on the edge of a shape with this tool to type text inside it.
- Type on a Path Tool: Flows text along the edge of a path. Text will conform to the shape of the path, like text around a circle.
- Vertical Type Tool: Creates vertical columns of text.
- Vertical Area Type Tool & Vertical Type on a Path Tool: Vertical versions of their horizontal counterparts.
- Touch Type Tool: Allows you to select and manipulate individual characters within a text object, changing their size, position, and rotation independently.
6. Line Segment Tool ()
The Line Segment Tool is straightforward – it draws straight lines. Simply click and drag with the tool to create a line in any direction.
Within this tool group, you’ll find more shape tools:
- Arc Tool: Draws curved lines or arcs.
- Spiral Tool: Creates spiral shapes.
- Rectangular Grid Tool: Makes grids of rectangles, useful for creating tables or structured backgrounds.
- Polar Grid Tool: Draws concentric circles intersected by radial lines, creating a polar grid.
7. Rectangle Tool (M)
The Rectangle Tool is used to create rectangles and squares. You can also find related shape tools grouped with it, such as the Ellipse Tool for circles and ovals, and the Polygon Tool for creating shapes with multiple sides.
To use these shape tools, select the desired tool and drag on the artboard to define the shape’s size.
8. Flare Tool
The Flare Tool is a more specialized tool that creates lens flare effects, simulating light reflections.
Click and drag with the Flare Tool to create a flare. After creating a flare, you can use the Selection Tool to access settings and customize the flare’s colors and appearance.
9. Paintbrush Tool (B)
The Paintbrush Tool simulates natural brush strokes. You can draw freehand paths that look like they were created with a brush, with variable stroke styles and effects.
The Paintbrush Tool offers a variety of brush styles, allowing for creative and artistic strokes in your designs.
10. Shaper Tool (Shift+N)
The Shaper Tool offers a more intuitive way to create basic shapes. Simply draw approximate shapes freehand, and the Shaper Tool will recognize your gestures and convert them into perfect geometric shapes.
This tool works best with symmetrical shapes like circles, rectangles, and triangles, making shape creation quick and easy.
11. Rotate Tool (R)
The Rotate Tool allows you to rotate objects around a pivot point.
You can click and drag to rotate an object freely, or hold Shift while rotating to constrain the rotation to 45-degree increments for precise rotations.
12. Scale Tool (S)
The Scale Tool resizes objects. You can scale objects uniformly or non-uniformly.
Drag the handles on the bounding box of an object with the Scale Tool to resize it. For uniform scaling (maintaining proportions), hold Shift while dragging.
13. Width Tool (Shift+W)
The Width Tool is unique; it allows you to vary the width of strokes along a path, creating dynamic and expressive line work.
Select points on a path with the Width Tool and drag to make those parts of the stroke thicker or thinner.
14. Warp Tool (Shift+R)
The Warp Tool distorts and reshapes objects by pushing and pulling areas of the object. It’s great for creating fluid and organic shapes.
Click and drag on the edges or corners of an object with the Warp Tool to create wave-like or distorted effects.
15. Free Transform Tool (E)
The Free Transform Tool provides a versatile way to manipulate objects. It combines scaling, rotating, skewing, and distorting into a single tool.
By dragging different handles on the bounding box with the Free Transform Tool, you can apply various transformations to your selected objects.
These are just some of the fundamental tools in Adobe Illustrator. By understanding their functions and practicing with them, especially the Magic Wand Tool for efficient selections, you’ll be well on your way to creating impressive graphic designs. Keep exploring and experimenting to unlock the full potential of Adobe Illustrator!