
Are you eager to dive into the world of graphic design using Photoshop but feeling overwhelmed by the array of tools? Don’t worry, understanding the basics is the perfect starting point. Photoshop is a powerhouse software for digital art and photo manipulation, and mastering its fundamental tools is crucial for any aspiring graphic designer. Let’s explore some essential Photoshop tools, with a special focus on the versatile Lasso Tool in Photoshop CS5.
Essential Photoshop Tools for Beginners
Photoshop offers a vast toolkit, but you don’t need to learn everything at once. Starting with the core tools will build a solid foundation for your design journey. Here are some key tools you should familiarize yourself with:
1. Move Tool
The Move Tool is your basic navigation tool. It allows you to reposition any selected object, layer, or text within your canvas. Simply click on the object you want to move and drag it to the desired location. The icon typically looks like a cursor with a cross arrow. The shortcut key for the Move Tool is V.
2. Marquee Tool
The Marquee Tool is your go-to for making selections in Photoshop. It allows you to select specific areas of your image for editing. Once you’ve made a selection, you can perform various actions like deleting, cutting, color adjustments, or applying effects to only that selected region.
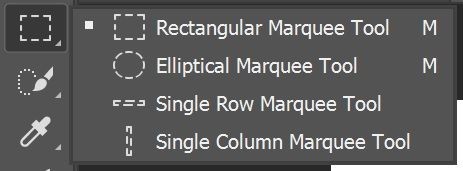
There are four main types of Marquee Tools:
- Rectangular Marquee Tool: Selects areas in a rectangular shape.
- Elliptical Marquee Tool: Selects areas in a circular or elliptical shape.
- Single Row Marquee Tool: Creates a 1-pixel high horizontal selection.
- Single Column Marquee Tool: Creates a 1-pixel wide vertical selection.
3. Lasso Tool: Your Freehand Selection Powerhouse
The Lasso Tool provides freehand selection capabilities, giving you more flexibility compared to the Marquee Tool. Instead of being confined to geometric shapes, you can draw selections directly onto your canvas, making it ideal for selecting irregularly shaped objects. This tool requires a steady hand as you manually trace the outline of the area you want to select.
But the Lasso Tool isn’t just one tool; it comes in variations to suit different selection needs:
- Lasso Tool (Freehand): The standard lasso tool lets you draw a freeform selection by dragging your mouse.
- Polygonal Lasso Tool: This is perfect for selections with straight edges. Click to set anchor points and create a polygon shape around the area you want to select.
- Magnetic Lasso Tool: This smart tool tries to snap to the edges of objects in your image, making it easier to select objects with well-defined boundaries.
How to Use the Lasso Tool in Photoshop CS5: A Step-by-Step Guide
Let’s focus on how to effectively use the Lasso Tool in Photoshop CS5. Here’s a simple guide:
-
Select the Lasso Tool: Find the Lasso Tool in your toolbar. It looks like a lasso (rope). If you see the Polygonal or Magnetic Lasso Tool icon instead, click and hold on the icon to reveal a flyout menu, and then choose the standard Lasso Tool.
-
Start Your Selection: Position your cursor where you want to begin your selection. Click and hold down your mouse button.
-
Draw Your Selection: Drag your mouse to draw a freehand outline around the object or area you wish to select. Move your mouse steadily and carefully along the edges of the object.
-
Close the Selection: To complete your selection, release the mouse button. Photoshop will automatically close the selection by drawing a straight line from your current point back to the starting point. For a more precise closure, you can drag your cursor back to the starting point and release the mouse when you see a small circle appear next to your lasso cursor – this indicates you are closing the path manually.
-
Refine Your Selection (Optional): After making your initial selection, you might need to refine it. You can use the “Add to selection” (Shift key while selecting) or “Subtract from selection” (Alt key while selecting) options in the Options bar at the top to modify your selection boundaries.
Tips for Mastering the Lasso Tool:
- Practice Makes Perfect: The Lasso Tool requires hand-eye coordination. Practice tracing different shapes and objects to improve your control and accuracy.
- Use Zoom: Zoom in (Ctrl + + or Cmd + +) for detailed selections, especially around intricate edges. Zoom out (Ctrl + – or Cmd + -) for broader strokes.
- Steady Hand: Try to keep your hand steady while drawing. If you make a mistake, you can undo (Ctrl + Z or Cmd + Z) and try again.
- Combine with Other Tools: The Lasso Tool is often used in conjunction with other selection tools. For instance, you might use the Quick Selection Tool for a general selection and then refine the edges with the Lasso Tool.
- Feathering: Consider using feathering in the Options bar before you start drawing if you want softer edges to your selection, which is useful for blending selections seamlessly into other parts of an image.
4. Quick Selection Tool & Magic Wand Tool
These are other powerful selection tools. The Quick Selection Tool lets you “paint” a selection using an adjustable brush, and it intelligently detects edges. The Magic Wand Tool selects areas based on color similarity.
Both tools are excellent for making quick selections, especially when dealing with objects that have distinct colors or edges. They can be faster than the Lasso Tool for certain tasks, but the Lasso Tool offers more manual control.
5. Crop Tool & Slice Tool
The Crop Tool is fundamental for adjusting the composition of your images by trimming away unwanted areas. The Perspective Crop Tool is a more advanced version that allows you to crop and correct perspective distortion simultaneously. The Slice Tool and Slice Select Tool are used primarily for web design to divide images into smaller sections for optimized web loading.
6. Eyedropper Tool
The Eyedropper Tool is simple but essential. It allows you to sample a color from anywhere in your image and set it as your foreground color. This is crucial for color matching and consistency in your designs.
7. Brush Tool
The Brush Tool is your digital paintbrush. You can use it for painting, drawing, and adding color to your designs. Photoshop offers a vast library of brushes, and you can customize brush settings for various effects.
The Pencil Tool is a variation that creates hard-edged lines, mimicking a traditional pencil.
8. Spot Healing Brush Tool
The Spot Healing Brush Tool and its related healing tools are primarily used for photo retouching. The Spot Healing Brush quickly removes blemishes and imperfections by blending surrounding pixels.
Example of using the Spot Healing Brush Tool to remove spots from a strawberry.
Other tools in this group include:
- Healing Brush Tool: Similar to the Spot Healing Brush but requires you to sample an area to use as a source for healing.
- Patch Tool: Allows you to select an area and replace it with pixels from another area.
- Content-Aware Move Tool: Moves and extends selections based on image content.
- Red Eye Tool: Specifically designed to remove red-eye in photos.
9. Eraser Tool
The Eraser Tool does exactly what you expect – it erases pixels. You can use it to remove parts of an image or create transparency.
Variations include the Background Eraser Tool, which erases backgrounds while preserving foreground edges, and the Magic Eraser Tool, which erases areas of similar color with a single click.
10. Gradient Tool
The Gradient Tool creates smooth color transitions. It’s often used for backgrounds or adding depth to designs.
11. Shape Tool
The Shape Tool allows you to create vector shapes like rectangles, ellipses, polygons, lines, and custom shapes. Vector shapes are scalable without losing quality, making them ideal for logos and graphics.
12. Pen Tool
The Pen Tool is a more advanced tool for creating precise vector paths and selections. It uses anchor points and handles to create curves and straight lines. While it has a learning curve, it’s invaluable for detailed selections and vector graphics.
13. Direct Selection Tool
The Direct Selection Tool is used to manipulate anchor points and paths created with the Shape or Pen Tools. It allows you to fine-tune vector shapes and paths.
14. Blur Tool
The Blur Tool softens areas of your image, reducing detail. It’s useful for creating depth of field effects or softening harsh edges.
15. Type Tool
The Type Tool is essential for adding text to your designs. You can create horizontal or vertical text, and Photoshop offers extensive text formatting options.
Conclusion
These are just some of the fundamental tools in Photoshop CS5, and mastering them is the first step towards unlocking your creative potential in graphic design. While each tool has its specific function, tools like the Lasso Tool offer versatility and are crucial for precise selections, a fundamental skill in Photoshop. Keep practicing, experiment with these tools, and you’ll be well on your way to creating stunning visuals. Continue to explore and deepen your skills to truly master the art of graphic design!