For anyone serious about optimizing their WordPress website for search engines, adding it to Google Search Console is a crucial first step.
This powerful tool provides invaluable insights into your website’s performance on Google Search. The analysis you gain can then be used to fine-tune your site for optimal visibility and effectiveness.
To unlock these benefits, you’ll first need to verify your website with Google Search Console.
Don’t worry, it’s a straightforward process! In this article, we’ll guide you through the verification steps with ease. Let’s dive in!
What is Google Search Console?
Google Search Console (formerly known as Google Webmaster Tools) is a free service offered by Google to help website owners monitor, maintain, and troubleshoot their site’s presence in Google Search results.
This tool delivers reports and data that are essential for understanding how your web pages appear in search results.
You can track your website’s search performance on Google Search, see how often your site appears, and how many clicks it receives.
This data is incredibly useful for refining existing content, informing new content creation, and developing effective SEO strategies for your website.
Google Search Console also allows you to submit your website’s XML sitemap, remove URLs you don’t want indexed, and help Google prioritize the most important content on your site for crawling and indexing.
Furthermore, this tool proactively alerts you to any critical issues with your site, such as crawling errors or indexing problems that might prevent Google from properly accessing and displaying your website.
Easy Steps to Verify Google Search Console
Here’s a step-by-step guide to verifying your website with Google Search Console:
1. Add Your Website to Google Search Console
First, you need to add your website to Google Search Console. Go to the Google Search Console website. Sign in using your Google account.
Enter your website’s URL in the URL prefix option. Then, click Continue.
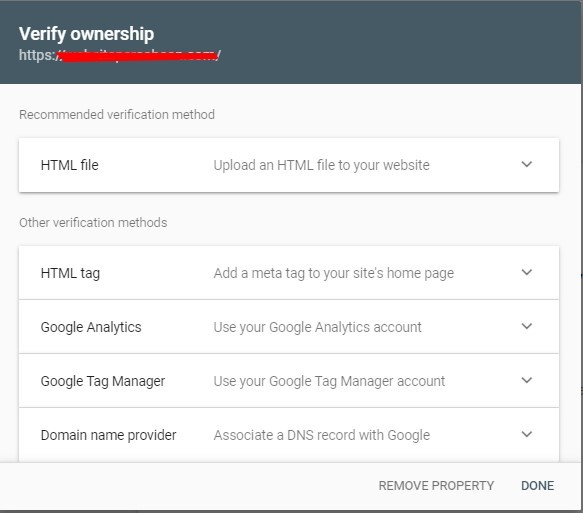
2. Choose a Verification Method
On the next page, you will be asked to verify ownership of the website you added.
Scroll down to see Other verification methods.
There are several verification methods available, including HTML file, HTML tag, and Domain Name Provider.
Select the method that works best for you. In the following sections, we will explain each method to help you choose the easiest option.
3. Verify Your Website with Google Search Console
There are multiple ways to add the verification code to your WordPress website. Here are some of the most common methods:
Using HTML File
You can verify your website by uploading an HTML file to your website’s root folder.
To upload files to your website folder, you can use FTP clients like FileZilla or your hosting provider’s File Manager. In this tutorial, we’ll use File Manager.
First, select the HTML file method in Google Search Console. Then, click Download the file.
Once downloaded, log in to your cPanel using your hosting account credentials. Find and open File Manager.
Navigate to the root folder of your website. If your website is on the main domain, this is usually the public_html folder. Click Upload and upload the HTML file you downloaded earlier.
After the upload is complete, return to the Google Search Console page and click Verify. Wait until you see a success notification.
Using HTML Tag
Choose the HTML tag method, and copy the meta tag provided. You will need to paste this meta tag into the <head> section of your website’s homepage.
To easily add the meta tag to your website’s header, you can use a plugin like Insert Headers and Footers for WordPress.
Log in to your WordPress dashboard. Go to Plugins > Add New. Search for “Insert Headers and Footers”, then click Install Now > Activate.
Once activated, go to Settings > Insert Headers and Footers. Paste the copied meta tag into the
Using Google Analytics
If you already use Google Analytics on your website, you can use it for verification.
Make sure you are using the same Google account for both Google Analytics and Google Search Console, and that you have “Edit” permissions in Google Analytics.
In Google Search Console, select the Google Analytics verification method. If your Analytics tracking code is already correctly placed in the <head> section of your website, verification should be automatic and instant. Click Verify in Google Search Console to confirm.
Using Google Tag Manager
You can also use Google Tag Manager for verification if you have it implemented on your site.
First, ensure you have a Google Tag Manager account set up. When setting up Tag Manager, you would have added code snippets to your website’s <head> and <body> sections.
In Google Search Console, choose the Google Tag Manager verification method. Similar to Google Analytics, if your Tag Manager container snippet is correctly installed, verification should be immediate. Click Verify in Google Search Console.
Using Domain Name Provider
The Domain Name Provider method involves adding a TXT record to your domain’s DNS settings.
Select Domain Name Provider in Google Search Console. Google will provide you with a TXT record. Copy this TXT record.
You can add this TXT record through your cPanel if your domain is connected to the same hosting account, or through your domain registrar’s DNS management area (e.g., Member Area Qwords if your domain is registered there).
In cPanel, go to Zone Editor, then click Manage next to the domain you want to verify. Click Add Record and choose TXT Record.
Paste the TXT record you copied from Google Search Console into the Value field. Click Add Record.
If using DNS Manager, you can follow the instructions provided by your domain registrar, often similar to these steps: https://kb.qwords.com/category/help-manual/custom-url-website-dari-google/ (This link is for reference to DNS management within Qwords, users should refer to their own registrar’s help).
4. Complete Verification in Google Search Console
After you have added the verification code using any of the methods above, return to the Google Search Console page and click the Verify button. If verification is successful, you will see a confirmation message like the one below.
Verify Your Google Search Console Account Today!
That’s it! You’ve successfully verified your website with Google Search Console. It’s easier than you might have thought, right?
Once your website is verified in Google Search Console, the next important step is to submit your XML sitemap. This helps Google find and crawl all the important pages on your site more efficiently.
The process is quite straightforward. If you have any further questions about website optimization or any services at Qwords.com, please don’t hesitate to contact our Technical Support team via live chat, phone, or by submitting a support ticket.
Happy optimizing, and we wish you success with your website!
Share this post