
The Clone Stamp Tool in Photoshop is a powerful and versatile feature, especially useful in the realm of photo editing and manipulation. If you’re looking to seamlessly duplicate objects, remove blemishes, or retouch images, mastering the Clone Stamp Tool is essential. Many designers refer to it simply as the “clone tool” due to its primary function: cloning parts of an image to another area. This tool is invaluable for anyone interested in photo manipulation, offering precise control over image alterations. This guide will explain how to effectively use the Clone Stamp Tool in Photoshop to enhance your photo editing skills.
At its core, the function of the Clone Stamp Tool in Photoshop is to replicate pixels from one area of your image to another. This process involves selecting a source point, which is the area you want to copy, and then “stamping” or painting those copied pixels onto a target area.
Understanding the Clone Stamp Tool
The Clone Stamp Tool works by sampling pixels from a defined source point in your image and then allowing you to paint those pixels elsewhere. Think of it as a digital stamp that copies and pastes textures, colors, and details. This functionality makes it incredibly useful for a variety of tasks, from removing unwanted elements to seamlessly repairing damaged areas in photos.
Key Features of the Clone Stamp Tool
- Source Point Selection: You define the area you want to clone from, giving you precise control over the cloning process.
- Brush Settings: Like many Photoshop tools, the Clone Stamp Tool utilizes brush settings. You can adjust brush size, hardness, opacity, and flow to achieve different effects. A soft brush is often preferred for seamless blending, while a hard brush can be used for more defined cloning.
- Alignment Options: Photoshop offers different alignment options for the Clone Stamp Tool, such as “Aligned” and “Non-Aligned.” “Aligned” mode means the source point moves relative to your brush strokes, maintaining the spatial relationship. “Non-Aligned” mode resets the source point each time you stop and start painting.
- Blending Modes: While less commonly used for basic cloning, blending modes can be applied to the Clone Stamp Tool for more advanced effects and subtle retouching.
Step-by-Step Guide: How to Use the Clone Stamp Tool
The Clone Stamp Tool is available in various versions of Photoshop, from older versions like CS3 to the latest Creative Cloud (CC) releases. The basic functionality remains consistent across versions. Here’s how to use it:
-
Open Photoshop and Your Image: Start by launching Adobe Photoshop and opening the image you want to edit. Navigate to
File > Openand select your image file. -
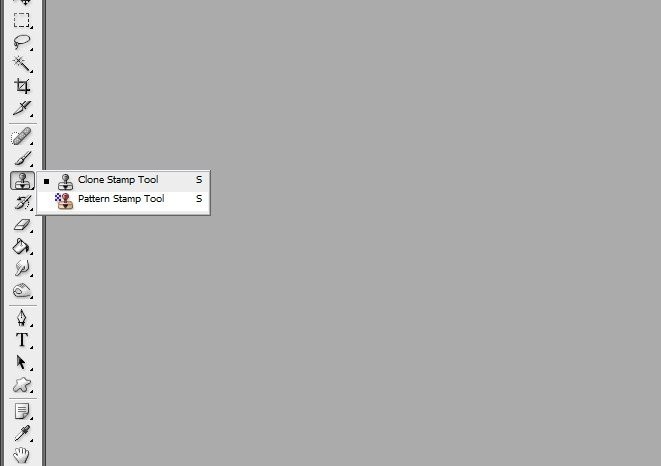
Select the Clone Stamp Tool: Locate the Clone Stamp Tool in the toolbar on the left side of your Photoshop interface. It is represented by an icon that looks like a rubber stamp. Alternatively, you can press the
Skey to quickly select the tool. -
Set the Source Point: This is a crucial step. To define the source point, hold down the
Altkey (Option key on Mac). Your cursor will change to a target-like symbol. Click on the area of the image you want to clone. This sets the source point – the area Photoshop will copy pixels from. -
Start Cloning: Release the
Altkey. Now, position your cursor over the area where you want to apply the cloned pixels. Click and drag to start painting with the cloned pixels. As you paint, you’ll see a crosshair (+) appear near your source point. This crosshair indicates the area Photoshop is currently sampling from as you clone.
Tips for Effective Use of the Clone Stamp Tool
- Brush Size and Hardness: Adjust the brush size to match the area you’re working on. Use a soft brush (low hardness) for blending edges and a hard brush for sharper, more defined cloning.
- Opacity and Flow: Lowering the opacity and flow allows for more gradual and subtle cloning, which is often better for retouching and blending.
- Frequent Source Point Adjustment: For complex cloning tasks, you may need to reset the source point frequently. This ensures that the cloned pixels blend seamlessly with the surrounding area and maintain realistic textures and lighting.
- Non-Destructive Editing: Work on a separate layer to keep your edits non-destructive. This allows you to easily adjust or undo your cloning without affecting the original image. Create a new blank layer above your image layer and select “Current & Below” in the Sample dropdown menu in the Clone Stamp Tool options bar.
- Practice and Patience: Mastering the Clone Stamp Tool takes practice. Experiment with different settings and techniques to understand how the tool works best in various situations.
Common Uses for the Clone Stamp Tool
- Retouching Portraits: Remove blemishes, wrinkles, and skin imperfections for smoother, more flawless portraits.
- Removing Unwanted Objects: Eliminate distracting elements from backgrounds, such as power lines, tourists, or trash.
- Duplicating Objects: Easily copy and paste objects within an image to create patterns, fill areas, or add more of a certain element.
- Restoring Old Photos: Repair scratches, tears, and damage in old photographs by cloning pixels from undamaged areas.
- Creating Seamless Textures: Extend or create repeating textures for backgrounds or design elements.
Conclusion
The Clone Stamp Tool is a fundamental tool in Photoshop for anyone looking to perform detailed image editing and manipulation. By understanding its function and practicing its use, you can achieve professional-level results in retouching, object removal, and creative image manipulation. Experiment with the steps outlined above and explore the various settings to unlock the full potential of the Clone Stamp Tool in your Photoshop workflow.