Hello again, fellow tech enthusiasts and car repair aficionados! As a content creator for obd2scanner.store and your trusted auto repair expert, I’m excited to bring you another detailed tutorial. Today, we’re diving into how to use Asus Flash Tool for Zenfone C (Z007). If your Asus Zenfone C Z007 is experiencing system issues such as bootloops (stuck on the logo), errors, restarts, being locked, or flash failures, this guide is for you. Flashing your device can often resolve these problems, and I’m here to walk you through each step.
So, how exactly do you fix a bootlooping (stuck logo) Asus Zenfone C Z007? Keep reading this article carefully to avoid any confusion and ensure a successful flashing process.
This method of flashing the Asus Zenfone C (Z007) using Asus Flash Tool has been personally tested and proven to be 100% effective in resolving bootloop issues and other software malfunctions. To further assist you and provide clear evidence of its success, I’ve included a video tutorial at the end of this article.
Before you begin the flashing process, it’s crucial to verify that the firmware version and model details of your Asus Zenfone C Z007 match the firmware version I’m using in this guide. Incompatible firmware can lead to flashing failures and further complications.
As a standard precaution before any flashing procedure, I strongly recommend backing up all important data stored on your phone’s internal memory. While flashing can breathe new life into your device, it will also erase all personal data, returning your phone to its factory default state, just like when you first bought it. If you’re already locked out of your phone’s menu due to system issues, data loss might be unavoidable.
Step-by-Step Guide: Flashing Asus Zenfone C (Z007) with Asus Flash Tool
-
Download the Asus Zenfone C Firmware: Obtain the correct firmware file for your Asus Zenfone C Z007. You can download the firmware WW-ZC451CG-4.11.40.55-rel-user-20150125-184047-signed by clicking the download link. After clicking, wait for 5 seconds and then click “skip” or “lewati,” followed by “allow” or “izinkan.” This will redirect you to the MediaFire download page.
-
Save Firmware File: Save the downloaded Asus Zenfone C Z007 firmware file to your computer desktop. This will make it easier to locate later. The firmware file name should be
WW-ZC451CG-4.11.40.55-rel-user-20150125-184047-signed.zip. -
Download and Install Asus Flash Tool: Download the Asus_FlashTool_Installer1.14_v1.0.0.11 tool. Install it by right-clicking the downloaded file, selecting “Run as administrator,” and following the on-screen instructions. The installer will automatically install the necessary drivers as well.
-
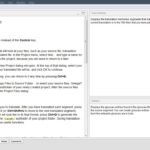
Launch Asus Flash Tool: Run the installed Asus Flash Tool. It’s usually found on your desktop. Right-click the Asus Flash Tool icon and choose “Run as administrator.” Wait for the application to open.
-
Select Model and Firmware: In the Asus Flash Tool interface, click on the “Model” dropdown menu and select ZC451CG. Then, click the brown folder icon (browser) and navigate to the Asus Zenfone C Z007 firmware file you downloaded earlier (in
.zipformat). Click “Open” to select the firmware. -
Enable Wipe Data: In the Asus Flash Tool, locate the “Wipe data” section. Check the “Yes” box and click “OK”. This option will erase all user data, ensuring a clean system installation and preventing potential flash failures.
-
Enter Fastboot Mode on Your Zenfone C Z007: Power off your Asus Zenfone C Z007 and ensure it has sufficient battery charge. Press and hold the Volume Up button and the Power button simultaneously until the device boots into Fastboot Mode (also known as Droidboot Mode).
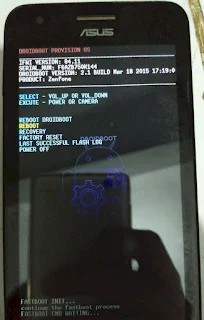 Tutorial Flash Asus Zenfone C (Z007) via FlashTool
Asus Zenfone C Z007 in Fastboot Mode, ready for flashing using Asus Flash Tool.
-
Connect to PC: With your Asus Zenfone C Z007 in Fastboot Mode, connect it to your computer using a USB cable. Your computer should recognize the device as “Asus Android Bootloader Interface” in Device Manager. The serial number of your phone will also appear in the Asus Flash Tool interface.
-
Start Flashing: Click on the serial number of your connected Asus Zenfone C in the Asus Flash Tool. Then, click the “Start” button. The flashing process will begin automatically. Wait patiently for the process to complete 100%.
-
Flashing Complete: Once the Asus Zenfone C Z007 flashing process is successfully finished, you will see a “flash image successfully” message in the Asus Flash Tool. Your Asus Zenfone C Z007 will then automatically restart. Wait for it to boot into the initial setup screen.
 Tutorial Flash Asus Zenfone C (Z007) via FlashTool
Congratulations! You have successfully flashed your Asus Zenfone C Z007 and it should now be functioning normally again.
If you encounter a situation where the flashing process completes without errors, but your Asus Zenfone C Z007 still experiences issues or shows no improvement, you can refer to this article: “flash sukses tapi masih sama saja” for further explanation and potential solutions.
To better understand the process of flashing your Asus Zenfone C Z007 via Asus Flash Tool, you can watch the video tutorial provided above. This video also serves as proof that this flashing tutorial has been tested and confirmed to be successful.
That concludes this tutorial on how to flash the Asus Zenfone C Z007 using Asus Flash Tool. If you have any questions or encounter difficulties with downloading the files, feel free to leave a comment below. Don’t forget to support us by subscribing to the EvilicaCell YouTube channel for more updates and tutorials on Asus devices and other tech solutions. See you in the next tutorial!
If you encounter any issues with the download links, such as broken links or Google Drive limits, try logging in with your Google account or contact the admin on Facebook EvilicaCell.