
Are you eager to dive into the world of graphic design but feel overwhelmed by Photoshop? Don’t worry! Photoshop, the industry-standard software for image editing and digital art, can be learned step by step. Understanding its tools is the crucial first step in unleashing your creative potential. This guide will introduce you to fundamental Photoshop tools, including how to find and use the Magic Wand Tool, helping you begin your journey into the realm of digital design.
1. The Move Tool
The Move Tool is your basic navigation tool in Photoshop. As its name suggests, it allows you to move objects, layers, or selections within your canvas. Simply click on the tool icon, usually represented by a crosshair cursor with arrows, or press V on your keyboard (its shortcut). Then, click and drag the element you want to reposition.
2. Marquee Tools for Selection
Marquee tools are your primary selection tools, enabling you to isolate specific areas of your image for editing. Once you’ve made a selection, you can perform actions like deleting, cutting, changing colors, or applying effects to only that selected portion.
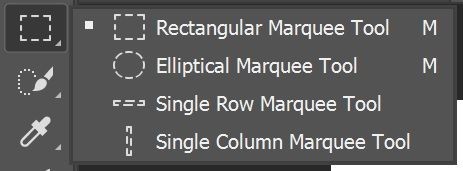
Photoshop offers different Marquee Tool variations:
- Rectangular Marquee Tool: Creates rectangular or square selections. Perfect for selecting objects with straight edges.
- Elliptical Marquee Tool: Creates circular or oval selections. Ideal for selecting round objects or creating circular masks.
- Single Row Marquee Tool & Single Column Marquee Tool: These tools select a single row or column of pixels, useful for very precise, line-based selections.
3. Lasso Tools for Freehand Selections
Lasso Tools provide more freeform selection capabilities compared to Marquee tools. They allow you to draw selections by hand, giving you greater control over irregular shapes. There are three main Lasso Tool options:
- Lasso Tool: The basic Lasso Tool lets you draw a freehand selection outline. You need to manually trace the object’s edge with your mouse or pen.
- Polygonal Lasso Tool: Creates selections using straight lines and angles. Click to set anchor points and create a polygonal selection.
- Magnetic Lasso Tool: This smart tool automatically snaps to the edges of objects in your image, making it easier to select complex shapes with defined boundaries.
Alt text: Freehand selection of a strawberry using the Lasso Tool in Photoshop, illustrating flexible object isolation.
In the example above, the Lasso Tool is used to select a portion of a strawberry, demonstrating its ability to isolate irregular shapes. This selection can then be moved or edited independently.
4. Quick Selection Tool and Magic Wand Tool: Selecting by Pixels
Now, let’s talk about the Magic Wand Tool and its close relative, the Quick Selection Tool. These tools are incredibly useful for making selections based on color and tone.
The Quick Selection Tool works by “painting” a selection onto your image. It intelligently detects edges and expands the selection based on color and texture similarity.
The Magic Wand Tool, the focus of our keyword “how to show magic wand tool in photoshop,” selects areas of an image based on tonal and color similarity. To find the Magic Wand Tool in Photoshop, look for an icon that resembles a wand with sparkling stars in the toolbar, usually located on the left side of your Photoshop interface. It is often grouped with the Quick Selection Tool. You might need to click and hold on the Quick Selection Tool icon to reveal the Magic Wand Tool in a fly-out menu.
How to Use the Magic Wand Tool:
- Select the Magic Wand Tool from the toolbar.
- Adjust Tolerance (in the Options Bar at the top): Tolerance determines the range of colors the Magic Wand will select. A lower tolerance selects a narrower range of colors similar to the pixel you click on. A higher tolerance selects a wider range of colors.
- Click on the area you want to select in your image. The Magic Wand will select pixels with similar colors based on your tolerance setting.
- Add to or Subtract from Selection: Use the Shift key to add to your selection (for selecting multiple areas) or the Alt/Option key to subtract from your selection.
Both the Quick Selection and Magic Wand tools are powerful for speeding up selection processes, especially when working with images that have areas of distinct color or tone. In the strawberry example, these tools could quickly select the red areas of the fruit.
5. Crop Tool and Slice Tool: Refining Image Dimensions
The Crop Tool is essential for adjusting the composition and dimensions of your image. It allows you to trim the edges of your image, focusing on the desired area. You can crop freely or constrain the crop to specific aspect ratios or dimensions.
The Perspective Crop Tool is a variation that lets you crop images with perspective distortion, allowing you to straighten and crop in one step.
The Slice Tool is used for web design and divides an image into smaller sections (slices). These slices can then be exported as individual images, optimizing loading times for websites. The Slice Select Tool is used to select and manipulate these slices.
The example shows the Crop Tool being used to define a rectangular area on the canvas, which will be retained after cropping.
6. Eyedropper Tool: Sampling Colors
The Eyedropper Tool is straightforward but incredibly useful. It allows you to sample a color from anywhere in your image and set it as your foreground or background color. This is crucial for maintaining color consistency and picking colors directly from your artwork.
Variations include the 3D Material Eyedropper Tool (for 3D objects) and the Color Sampler Tool, which provides RGB and CMYK color information for sampled points. Within the Eyedropper Tool group, you’ll also find:
- Ruler Tool: Measures distances and angles on your canvas.
- Note Tool: Adds text notes directly to your Photoshop file for reminders or collaboration.
- Count Tool: Counts objects within your image, helpful for inventory or analysis.
In the example, the Eyedropper Tool samples the red color of the strawberry, making it the active foreground color.
7. Brush Tool: Painting and Drawing
The Brush Tool is your digital paintbrush in Photoshop. It allows you to paint strokes of color onto your image. Photoshop offers a vast library of brushes, simulating various artistic media from soft airbrushes to textured paintbrushes. You can customize brush size, hardness, shape, and more.
The Options Bar at the top changes when the Brush Tool is selected, offering controls for brush settings. Related tools include:
- Pencil Tool: Creates hard-edged lines, similar to a traditional pencil.
- Color Replacement Tool: Replaces a specific color in your image with your selected foreground color while preserving texture and shading.
- Mixer Brush Tool: Simulates realistic paint mixing and blending directly on your canvas.
8. Spot Healing Brush Tool: Retouching Imperfections
The Spot Healing Brush Tool is a powerful retouching tool, primarily used for removing blemishes and imperfections in photos. It works by seamlessly blending texture, lighting, transparency, and shading from the surrounding pixels to “heal” the targeted area.
Alt text: Spot Healing Brush Tool being used to remove spots from a strawberry in Photoshop, showing its retouching capabilities.
Photoshop offers a suite of healing and patching tools:
- Healing Brush Tool: Similar to the Spot Healing Brush, but requires you to define a source area to sample texture and color from. Hold Alt/Option and click to set the source, then paint over the area to heal.
- Patch Tool: Repairs larger areas by replacing a selected area with pixels from another part of the image or a pattern.
- Content-Aware Move Tool: Moves and extends selected objects, intelligently filling in the gap left behind and blending the moved object into its new location.
- Red Eye Tool: Specifically designed to remove red-eye caused by camera flash in photographs.
9. Eraser Tool: Removing Pixels
The Eraser Tool does exactly what you’d expect – it erases pixels in your image, making them transparent. You can control the brush size and hardness of the Eraser Tool for different effects.
Variations include:
- Background Eraser Tool: Erases the background around an object, automatically sampling and erasing similar colors to isolate the foreground.
- Magic Eraser Tool: Erases areas of similar colors with a single click, similar to the Magic Wand Tool but for erasing instead of selecting.
10. Gradient Tool: Blending Colors
The Gradient Tool creates smooth transitions between colors. Gradients are often used for backgrounds, adding depth and visual interest. Photoshop provides various gradient types (linear, radial, angular, reflected, diamond) and allows you to customize gradient colors and blending modes.
Related tools include the Paint Bucket Tool, which fills areas of similar color with a solid color or pattern, and the 3D Material Drop Tool for applying materials to 3D objects.
11. Shape Tools: Creating Vector Shapes
Shape Tools allow you to create vector-based shapes, which are scalable without losing quality. Photoshop offers a range of preset shapes, including rectangles, rounded rectangles, ellipses, polygons, lines, and custom shapes.
You can customize the fill and stroke (outline) of shapes, and they are created on separate shape layers, making them non-destructive and easily editable.
12. Pen Tool: Precise Path Creation
The Pen Tool is a powerful tool for creating precise paths and selections. It uses anchor points and handles to define curves and straight lines. While it has a learning curve, mastering the Pen Tool provides unparalleled control for complex selections and vector graphics.
Variations include:
- Freeform Pen Tool: Allows you to draw paths freehand, similar to the Lasso Tool but creating vector paths instead of pixel-based selections.
- Add Anchor Point Tool & Delete Anchor Point Tool: Used to add or remove anchor points on existing paths, refining their shape.
- Convert Point Tool: Changes anchor points between smooth curves and sharp corners.
The example shows the Pen Tool creating a path with anchor points around a strawberry leaf, demonstrating its precision for detailed selections.
13. Direct Selection Tool: Path and Shape Editing
The Direct Selection Tool is used to manipulate anchor points and segments of vector paths and shapes created with the Pen Tool or Shape Tools. It allows you to fine-tune the curves and angles of your vector artwork. The Path Selection Tool is used to select and move entire paths or shapes.
The example shows the Direct Selection Tool being used to adjust the anchor points of an arrow shape, demonstrating its ability to edit vector shapes directly.
14. Blur Tool: Softening Details
The Blur Tool softens edges and details in your image. It’s useful for creating depth of field effects, reducing noise, or softening harsh lines. Variations include the Sharpen Tool, which increases sharpness and detail, and the Smudge Tool, which simulates dragging paint across the canvas, creating a smeared or blended effect.
Alt text: Blur Tool applied to a portion of a strawberry in Photoshop, illustrating the softening effect on image details.
The example shows the Blur Tool softening a section of the strawberry, creating a blurred effect.
15. Type Tool: Adding Text
The Type Tool is used to add text to your Photoshop documents. You can create horizontal or vertical text, as well as type masks (text-shaped selections).
The Options Bar provides extensive controls for font, style, size, color, and text alignment. The example shows text options and the selection created by the Horizontal Type Mask Tool.
These are just some of the fundamental tools in Photoshop. As you continue to explore and practice, you’ll discover even more tools and techniques to enhance your graphic design skills. Start experimenting with these tools, especially the Magic Wand Tool to understand selections, and watch your creativity unfold!