Microsoft Windows provides a useful built-in utility called Snipping Tool, designed for capturing screenshots on your computer. This tool is readily available in Windows 10, Windows 8, Windows 7, and Windows Vista. If you’re using Windows 8 and looking for a straightforward way to take screenshots, the Snipping Tool is your answer. If for any reason you can’t locate it, don’t worry! You can also consider downloading a free alternative like Capture Screenshot lite, which closely resembles the Snipping Tool in functionality and appearance. You can find it here: https://www.gutmannsoft.com/en/screenshot/capture-screenshot-lite.php. Be sure to select the download link at the bottom of their page to get the free version.
How to Find and Open Snipping Tool in Windows 8
The process to access the Snipping Tool in Windows 8 is quite simple and intuitive. Just follow these steps:
- Access the Start Menu: From your Windows 8 interface, navigate to the “Start” screen.
- Initiate a Search: Begin typing “Snipp” (note the two ‘p’s) directly on the Start screen. Windows 8’s search function will automatically activate as you type.
- Locate Snipping Tool: As you type, the search results will appear on the left side of the screen. You should see the “Snipping Tool” icon listed under the “Apps” category.
- Launch the Application: Click on the “Snipping Tool” icon. This will launch the Snipping Tool application on your Windows 8 desktop, allowing you to start capturing screenshots.
 Start Snipping Tool in Windows 8 from Apps search
Quick Guide to Launch Snipping Tool in Windows 10
If you happen to be using Windows 10, the method to open the Snipping Tool is equally easy, although with a slight variation in the search term:
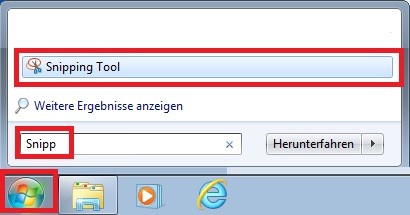
- Go to Search: Click on the “Search” icon, which often appears as a magnifying glass or a search bar located on the taskbar, typically near the Start button.
- Type “Snip”: In the search bar, type “Snip” (just one ‘p’ this time).
- Select Snipping Tool: From the search results, click on the “Snipping Tool” application. The Snipping Tool will then open, ready for you to take screenshots.
Basic Steps to Capture a Screenshot Using Snipping Tool
Once you have the Snipping Tool open, capturing a screenshot is a breeze. Here’s a quick rundown:
- Click “New”: In the Snipping Tool interface, click on the “New” button. The screen will dim slightly, indicating that the tool is ready to capture.
- Select Capture Area: Use your mouse cursor to click and drag around the area of the screen you want to capture. You can choose to capture a rectangular area, a free-form shape, a specific window, or the entire screen.
- Screenshot Captured: Once you release the mouse button, the selected area will be captured, and the screenshot will appear in the Snipping Tool window.
- Save Your Snip: In the Snipping Tool window, you can annotate, save, or copy your screenshot. To save, click the “Save Snip” button (the floppy disk icon), choose a location and filename, and click “Save”.
Frequently Asked Questions about Snipping Tool
Can I print directly from the Snipping Tool?
No, the standard Microsoft Windows Snipping Tool does not have a direct print function. However, a simple workaround is to copy the snip and paste it into MS Paint or Word, or use the suggested alternative tool Capture Screenshot Lite which may offer printing options.
Is there a way to make the Snipping Tool start automatically when Windows starts?
The Snipping Tool doesn’t have a built-in auto-start option. For older Windows versions like Windows 7, you could add it to the Autostart group. In Windows 8 and later, you might need to use Task Manager to create a startup task. Alternatively, tools like Capture Screenshot Lite often include options for automatic startup in their settings.
Can I use the Print Screen key with the Snipping Tool?
Yes, you can integrate the Print Screen key with the Snipping Tool. First, click “New” in the Snipping Tool, then press the ESC key on your keyboard, followed by the Print Screen key. This allows you to capture the entire screen using the Print Screen functionality while leveraging the Snipping Tool interface for editing and saving.
How do I capture a screenshot of a menu that disappears when I click away?
This is a common challenge! Use the ESC key trick mentioned above. Open the menu you want to capture, then quickly press ESC, followed by the Print Screen key. This should allow you to capture the menu in your screenshot using the Snipping Tool.
By following these steps, you should be well-equipped to download (if necessary) and effectively use the Snipping Tool in Windows 8 and even Windows 10 for all your screenshot needs.