If you’re searching for “Cara Download Brush Tool Photoshop Cs6”, you’re likely looking for a straightforward guide on how to install custom brushes in Adobe Photoshop CS6. While the term might be a mix of languages, the goal is clear: getting new and exciting brushes into your Photoshop CS6 toolkit to enhance your creative projects. Good news! Installing Photoshop brushes, also known as Tool Presets, is a simple process. Let’s walk through the steps to get your new brushes ready to use.
How to Install Photoshop Brushes in Photoshop CS6 – Text Tutorial
The most common format for Photoshop brushes is the Tool Preset file, which has a .tpl extension. Here’s how to install them using the traditional method in Photoshop CS6:
Open the Tool Presets Panel
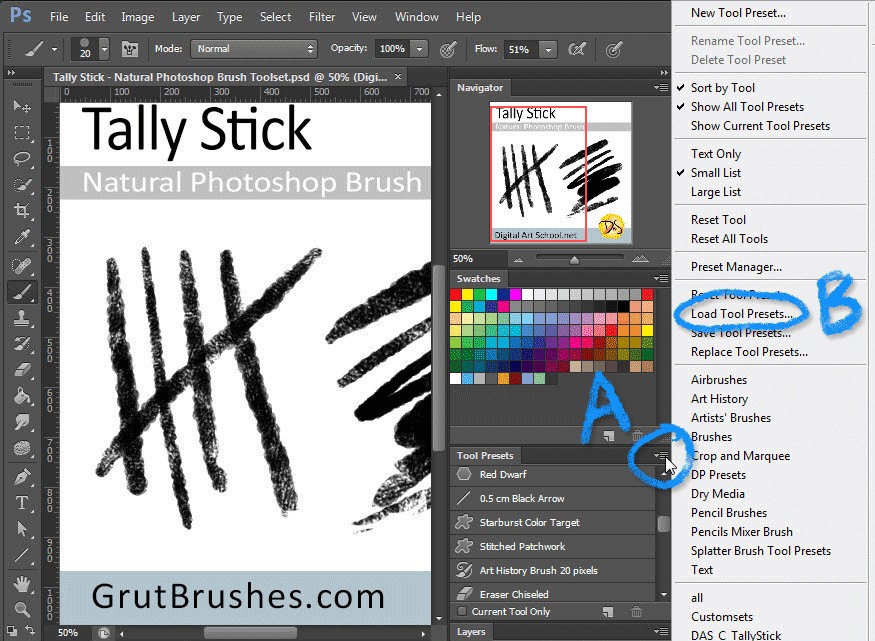
First, you need to access the Tool Presets panel within Photoshop CS6. If it’s not visible on your workspace, navigate to the top menu bar. Click on Window and from the dropdown menu, select Tool Presets. This will open the Tool Presets panel, usually docked on the side of your Photoshop interface.
Choose “Load Preset”
Once the Tool Presets panel is open, look for a small triangle icon, usually located in the top right corner of the panel. Click on this triangle to reveal the Tool Preset menu. From this menu, select Load Preset. This option allows you to browse your computer and select the brush file you want to install.
Select the .tpl File to Install
After clicking “Load Preset”, a file explorer window will appear. Navigate to the location where you saved your downloaded Photoshop brush file (the .tpl file). Select the .tpl file that you wish to install into Photoshop CS6 and click Open.
Once you’ve selected and opened the .tpl file, your new custom Photoshop brushes will appear in the Tool Presets panel. You should now be able to see them listed and ready to use. If you have many brushes, you might want to scroll through the panel to find your newly installed set.
If you can’t immediately see the brushes, ensure that you have the correct tool selected in Photoshop that the brushes are designed for (like the Brush Tool itself). Also, check if the “Current Tool Only” box is checked in the Tool Presets panel menu; if it is, uncheck it to see all loaded presets regardless of the currently active tool.
New Method: Drag and Drop Installation (For Newer Photoshop Versions & Some CS6)
While Photoshop CS6 is an older version, some installations and slightly newer updates of CS6 might support a more convenient method: drag and drop. This method is standard in more recent Photoshop versions and is incredibly simple.
Simply locate the .tpl file on your computer, and then drag it directly into the open Photoshop CS6 window. You can try dragging it onto the Tool Presets panel itself. If that doesn’t work, try dragging the .tpl file to the top menu bar area of Photoshop. Photoshop should recognize the file and automatically install the brushes into your Tool Presets.
With your brushes successfully installed using either of these methods, you’re now ready to explore new creative possibilities within Photoshop CS6. Enjoy experimenting with your new brush tools!