
Today, we’re diving into a tutorial about blogs, a topic we haven’t covered in a while. We’re going to discuss something common for website managers but can be tricky for beginners: registering your website or blog with Google Webmaster Tool, now known as Google Search Console.
First, go to the Google Search Console website at this link.
Login or create an account if you don’t already have one.
After logging in, you’ll see a page like the one below. Enter the URL of your site or blog and click “Add Property”.
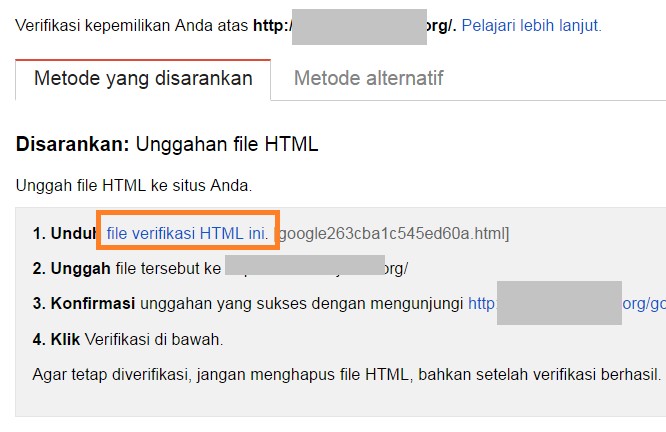
Google Search Console will then ask you to verify that you own the site. There are a couple of ways to do this. If you’re using self-hosted WordPress, the recommended method is usually the easiest. It involves downloading an HTML verification file and uploading it to your website.
What about blogs that aren’t self-hosted WordPress? The process is a bit different.
For free Blogger.com blogs, choose the “Alternate methods” menu and copy the provided code. Paste this code into your Blogger template by going to “Template” -> “Edit HTML”. Find the <head> tag and paste the code right below it. Save your template and then verify through Google Search Console.
Another option for self-hosted WordPress blogs is to use the alternate method and copy the code. You can paste this code by going to “Appearance” -> “Editor” and finding the header.php file. Paste the code below the <head> tag and click “Update File”. Then, verify in Google Search Console.
For free WordPress.com blogs, you can copy the code into the “Tools” -> “Webmaster Tools” -> “Google Webmaster Tools” menu and activate it.
Let’s get back to verifying self-hosted WordPress using the recommended method.
Login to your cPanel server and click “File Manager”.
Then, click “public_html” and then click on the domain you want to verify. If you only have one domain, just stay in “public_html”.
Click the “upload” menu and upload the HTML file you downloaded from Google Search Console earlier.
Once it’s uploaded, go back to the Google Search Console page and click the “Verify” button.
That’s it, your blog is now verified! But is that all? Not quite. You should also upload a sitemap so search engines can index your blog more effectively.
In Google Search Console, you can also monitor broken links or 404 errors and remove them. You can also detect backlinks that negatively impact your blog and request Google’s crawl bot to recrawl your site, and much more. We’ll cover these concrete steps another time.
Header image source: YouTube.