
Maintaining your car’s engine is crucial for its longevity and performance. Among the many maintenance tasks, valve adjustment is often overlooked, yet it plays a vital role in ensuring your engine runs smoothly and efficiently. This guide will walk you through the process of car valve adjustment, focusing on the Car Valve Adjustment Tools you’ll need and how to use them effectively. Whether you’re a seasoned DIY mechanic or just starting, understanding valve adjustment and having the right tools will empower you to keep your engine in top condition.
Understanding Car Valve Adjustment and Its Importance
Before diving into the tools, it’s important to understand why valve adjustment is necessary. Your car’s engine valves control the intake of air and fuel and the exhaust of combustion gases. These valves open and close at precise moments, orchestrated by the camshaft. Over time and with regular engine operation, the clearance between the valve stem and the rocker arm (or tappet, depending on your engine type) can change. This clearance, often referred to as valve lash, is critical for proper valve operation.
Why is proper valve clearance so important?
- Optimal Engine Performance: Correct valve clearance ensures valves open and close fully and at the right time. Improper adjustment can lead to reduced engine power, poor fuel economy, and rough idling.
- Preventing Valve Damage: If valve clearance is too tight (too little gap), valves may not fully close when the engine heats up. This can lead to burnt valves, a serious and costly engine problem. Conversely, if the clearance is too loose (too much gap), it can cause noisy operation and wear and tear on valve train components.
- Engine Longevity: Regular valve adjustments contribute to the overall health and lifespan of your engine by preventing unnecessary wear and tear on valve components.
When Should You Perform a Car Valve Adjustment?
The frequency of valve adjustments varies depending on the vehicle make and model. Consult your car’s service manual for the manufacturer’s recommended intervals. However, here are some general guidelines and signs that indicate your valves might need adjustment:
- Mileage Intervals: Many manufacturers recommend valve adjustments every 30,000 to 60,000 miles. Some older or high-performance engines may require more frequent adjustments.
- Noisy Engine: A noticeable “ticking” or “tapping” sound from the engine, especially when cold, can indicate excessive valve clearance.
- Rough Idling: Improper valve clearance can cause uneven cylinder pressures, leading to a rough or unstable idle.
- Reduced Engine Performance: A decrease in power, acceleration, or fuel economy could be a sign of valve adjustment issues.
- After Major Engine Work: If you’ve had cylinder head work, camshaft replacement, or other significant engine repairs, valve adjustment is typically necessary.
Essential Car Valve Adjustment Tools
Performing a valve adjustment requires specific car valve adjustment tools to ensure accuracy and efficiency. Here’s a list of the essential tools you’ll need:
-
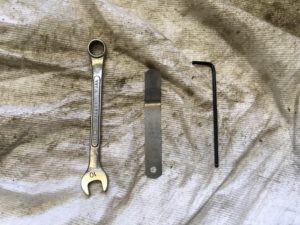
Feeler Gauges: Feeler gauges are the most critical tools for valve adjustment. These thin blades of precisely measured thickness are used to measure the gap between the valve stem and the rocker arm.
- Angled Feeler Gauges: Angled feeler gauges are particularly useful in tight engine compartments where access to the valve adjustment points may be restricted. The angle allows for easier insertion and measurement.
- Go/No-Go Feeler Gauges: Some feeler gauge sets include “go/no-go” blades. These blades have a stepped design, with two thicknesses on one blade (e.g., 0.010″ and 0.012″). This simplifies checking if the clearance is within the specified range. If the thinner part (“go”) slides in but the thicker part (“no-go”) doesn’t, the clearance is within spec.
-
Wrenches: You’ll need wrenches to loosen and tighten the valve adjuster lock nuts. The size will vary depending on your vehicle, but a 10mm wrench is common for many cars, especially older models and certain BMW engines as highlighted in the original article.
-
Valve Adjustment Tool (Adjuster): This tool is used to turn the valve adjuster screw or eccentric to change the valve clearance. The type of adjuster varies:
- Allen Key or Hex Key: Many valve adjusters have a hexagonal recess that requires an Allen key to turn. Having a set of Allen keys of various sizes ensures you have the right one.
- Bent Rod or Specialized Adjuster Tool: Some adjusters, particularly eccentrics found in some BMW engines, are best adjusted with a bent rod or a specialized tool with a right-angle bend that fits into a hole on the eccentric. A modified coat hanger can work in a pinch, but a dedicated tool offers better control and prevents slippage.
-
Socket and Wrench for Crankshaft Rotation: To access each valve for adjustment, you need to rotate the engine. A socket and wrench that fit the crankshaft pulley bolt are necessary for manual engine rotation. The size of the socket will depend on your car’s engine.
-
Valve Cover Gasket (Recommended): When you remove the valve cover to access the valves, it’s highly recommended to replace the valve cover gasket. Old gaskets can be brittle and may leak oil after being disturbed. Having a new gasket ensures a proper seal and prevents oil leaks.
-
Cleaning Supplies (Optional but Recommended): Before removing the valve cover, it’s good practice to clean the area around it to prevent dirt and debris from falling into the engine. You may need:
- Shop Rags or Paper Towels: For wiping away dirt and oil.
- Compressed Air (Optional): To blow away loose dirt and debris.
- Degreaser or Engine Cleaner (Optional): For cleaning heavily soiled valve covers.
Step-by-Step Guide to Car Valve Adjustment
Once you have gathered your car valve adjustment tools, you can proceed with the valve adjustment process. Always consult your vehicle’s service manual for specific valve clearance specifications and procedures for your engine. The following is a general guide based on common practices and the original article’s insights, particularly applicable to single overhead cam engines.
Safety First:
- Work on a Cold Engine: Valve adjustment should always be performed on a cold engine. This ensures accurate readings as metal expands when hot, affecting valve clearance.
- Disconnect the Negative Battery Terminal: This is a general safety precaution when working on any car maintenance task.
- Work in a Well-Ventilated Area: Engine fumes can be harmful.
Procedure:
-
Preparation:
- Gather all necessary car valve adjustment tools and supplies.
- Refer to your car’s service manual for valve clearance specifications (intake and exhaust valves may have different specs).
- Remove the spark plugs. This makes it easier to rotate the engine by hand as you’re not working against compression.
-
Exposing the Valvetrain:
- Locate and remove any components obstructing access to the valve cover, such as air intake ducts, hoses, or wiring harnesses. Be careful with older wiring, as insulation can become brittle.
- Clean the valve cover and the surrounding area to prevent dirt from falling into the engine when the cover is removed.
- Carefully remove the valve cover bolts and detach the valve cover. Place it aside in a clean area.
-
Understanding Valve Clearance Specifications:
- Your service manual will specify the valve clearance range for your engine (e.g., 0.006-0.008 inches for intake, 0.010-0.012 inches for exhaust). Note these values.
-
Rotating the Engine and Finding Top Dead Center (TDC):
- Use your socket and wrench on the crankshaft pulley bolt to rotate the engine clockwise (unless specified otherwise in your service manual).
- You need to bring each cylinder to Top Dead Center (TDC) of the compression stroke to adjust its valves. At TDC, both valves for that cylinder should be fully closed (rocker arms loose).
-
Using the Overlapped Valve Method (Companion Cylinder Rule):
- A helpful method to find TDC is the “Overlapped Valve Method” or “Companion Cylinder Rule,” especially for engines with a known firing order.
- Determine your engine’s firing order. It’s often found on the valve cover or in the service manual. For example, for a 6-cylinder engine with a 1-5-3-6-2-4 firing order:
  1 5 3
  6 2 4
Cylinders in the same column are “companion cylinders.”
- Observe the rocker arms of cylinder #1. Rotate the engine until the rocker arms of cylinder #1 are “overlapped” – meaning both intake and exhaust valves are partially open (rockers moving equally). At this point, cylinder #6 (the companion cylinder) will be at TDC of its compression stroke, and its valves can be adjusted.
- Repeat this process for each cylinder pair based on the firing order. When cylinder #5 rockers are overlapped, adjust cylinder #2 valves, and when cylinder #3 rockers are overlapped, adjust cylinder #4 valves.
-
Adjusting the Valves:
- For the cylinder you are adjusting, ensure the camshaft lobes are pointing away from the rocker arms, and the rocker arms are resting on the base circle of the cam.
- Select the appropriate feeler gauge blade according to your valve clearance specification.
- Insert the feeler gauge between the valve stem tip and the rocker arm adjuster.
- Use your wrench to loosen the lock nut on the valve adjuster.
- Use your Allen key or valve adjuster tool to turn the adjuster screw or eccentric. Adjust the clearance until you feel a slight drag on the feeler gauge when you slide it in and out. It should not be too tight or too loose.
- Once you’ve achieved the correct clearance, hold the adjuster screw in place with your Allen key and tighten the lock nut with the wrench to the specified torque (if provided in the service manual, otherwise, snug it down firmly but don’t overtighten).
- Re-check the valve clearance with the feeler gauge after tightening the lock nut, as tightening can sometimes change the adjustment. Readjust if necessary.
- Repeat this process for all valves, cylinder by cylinder, following the firing order and companion cylinder method.
-
Reassembly and Final Checks:
- Once all valves are adjusted, install a new valve cover gasket onto the valve cover.
- Carefully reinstall the valve cover and tighten the bolts to the specified torque.
- Reconnect any components you removed for access, such as air ducts or hoses.
- Reconnect the negative battery terminal.
- Reinstall the spark plugs and spark plug wires/connectors.
- Start the engine and listen for any unusual noises. A slight ticking sound is normal, especially with looser valve clearances, but excessive noise indicates further adjustment may be needed.
- Check for oil leaks around the valve cover after running the engine for a while.
Tips and Best Practices for Valve Adjustment
- Double-Check Specifications: Always verify the correct valve clearance specifications for your specific engine in your car’s service manual.
- Cleanliness is Key: Keep the area around the valve cover clean to prevent dirt from entering the engine.
- Don’t Drop Anything: Be extremely careful not to drop any tools or parts into the valvetrain area.
- Take Your Time: Valve adjustment is a precision task, so don’t rush. Take your time to ensure each valve is adjusted correctly.
- Consider Go/No-Go Gauges: For beginners, go/no-go feeler gauges can simplify the process of determining if the clearance is within spec.
- Re-check Your Work: If you’re unsure about any adjustment, rotate the engine through a full cycle and re-check all valve clearances. It’s better to be thorough than to risk engine damage.
- Listen to Your Engine: Pay attention to the engine sound before and after valve adjustment. Ideally, the engine should run smoother and quieter after a successful adjustment.
Conclusion
Proper car valve adjustment is a vital maintenance task that can significantly impact your engine’s performance, efficiency, and longevity. By using the correct car valve adjustment tools and following a systematic procedure, you can confidently perform this maintenance yourself. Remember to always consult your vehicle’s service manual for specific instructions and valve clearance specifications. Regular valve adjustments, along with other routine maintenance, will help keep your engine running reliably for years to come.