
Connecting an OBD2 scanner to your PC opens up a world of possibilities for vehicle diagnostics, performance monitoring, and understanding your car’s health. Whether you’re a seasoned mechanic or a car owner keen on understanding your vehicle better, using an OBD2 scanner with your computer provides a powerful and user-friendly interface for accessing real-time data and troubleshooting issues. This guide will walk you through the process of how to Add Obd Scanner To My Pc, ensuring a smooth and successful connection so you can start diagnosing your vehicle right away.
Before we begin, it’s important to understand that this process typically involves a Bluetooth-enabled OBD2 scanner and a Windows PC. Let’s dive into the steps to get your devices connected and communicating effectively.
Step 1: Enabling Bluetooth on Your Windows PC
The first step to add obd scanner to my pc wirelessly is to ensure Bluetooth is enabled on your computer.
If you are using an external USB-to-Bluetooth adapter, you’ll need to install the drivers provided by the manufacturer. Refer to the adapter’s manual for specific installation instructions.
For laptops, tablets, or desktop PCs with built-in Bluetooth, you’ll typically need to enable it through Windows settings. Here’s how you can do it:
- Click on the Start Menu (Windows icon) in the bottom-left corner of your screen.
- Click on the Settings icon (gear icon).
- Navigate to Devices and then select Bluetooth & other devices.
- Ensure the Bluetooth toggle is switched to the ‘On’ position.
Consult your PC’s owner’s manual if you need more detailed instructions on enabling Bluetooth, as the exact steps might vary slightly depending on your specific computer model.
Step 2: Locating the OBD-II Diagnostic Connector in Your Vehicle
To add obd scanner to my pc, you first need to physically connect the OBD2 scanner to your vehicle. The OBD-II diagnostic connector is a standardized port present in virtually all cars and light trucks manufactured since 1996.
This connector is always located inside the passenger compartment, typically within or near the dashboard area. While often exposed for easy access, it can sometimes be hidden by a small plastic cover or located behind an ashtray or coin tray.
The most common location for the OBD-II port is underneath the steering column, just below the driver’s side dashboard. Take a look in this area first. You might need to crouch down and look upwards to spot it.
Step 3: Plugging in Your OBDLink Scanner to the Diagnostic Connector
Once you’ve located the OBD-II port, take your OBDLink scanner and carefully plug it in.
It’s designed to fit snugly, so you shouldn’t need excessive force. However, ensure it’s firmly connected for a stable connection.
As soon as the OBDLink scanner is properly plugged in, the ‘Power’ LED on the device should illuminate and turn solid green, indicating it’s receiving power.
For OBDLink models that support Wi-Fi, you might also notice the ‘Wi-Fi’ light emitting a flash every 3 seconds, signaling it’s ready for a Wi-Fi connection, although for this guide, we are focusing on Bluetooth connectivity to add obd scanner to my pc.
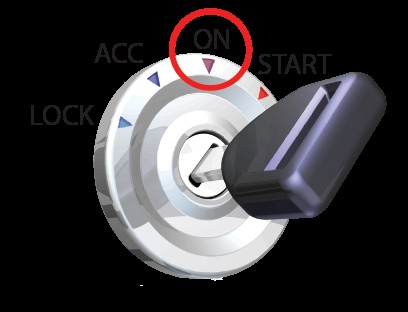
Step 4: Turning the Ignition Key to the ‘ON’ Position
After physically connecting the OBD2 scanner, the next crucial step to add obd scanner to my pc and establish communication with your vehicle’s computer is to turn your car’s ignition key to the ‘ON’ position.
On many vehicles, the ‘ON’ position is clearly marked with the Roman numeral ‘II’. If there are no markings, simply turn the key clockwise to the position just before you would start the engine. This position activates the vehicle’s electrical systems and powers up the OBD-II port, allowing the scanner to communicate with the car’s computer.
Do not start the engine at this stage. The ‘ON’ position is sufficient for establishing a connection and accessing diagnostic data.
Step 5: Making Your OBDLink Discoverable for Pairing
With the OBDLink scanner plugged in and the ignition in the ‘ON’ position, you now need to make the scanner discoverable so your Windows PC can find and pair with it via Bluetooth.
Locate the ‘Connect’ button on your OBDLink device and press it.
Upon pressing the ‘Connect’ button, the ‘BT’ (Bluetooth) light on the OBDLink scanner will begin blinking at a faster rate. This indicates that the device is now in pairing mode and is discoverable by Bluetooth devices.
Important Note: You typically have a 2-minute window to complete the Bluetooth pairing process in the next step. If you exceed this time, the OBDLink scanner might stop broadcasting its Bluetooth signal. If this happens, simply press the ‘Connect’ button again to re-enter pairing mode and give yourself another 2 minutes.
Step 6: Pairing OBDLink with Your Windows Computer via Bluetooth
Now that your OBDLink scanner is discoverable, you can proceed to pair it with your Windows PC. This step is essential to add obd scanner to my pc and enable wireless communication.
- Go to the Windows System Tray, usually located in the bottom-right corner of your screen, and right-click on the Bluetooth icon.
- From the context menu, select ‘Add a Device’.
Windows will automatically start scanning for nearby Bluetooth devices. After a few moments, it should discover and display your OBDLink device in the list of available devices. The device will likely be named simply ‘OBDLink’.
- Click on ‘OBDLink’ in the list and then click the ‘Next’ button.
Depending on your Windows Bluetooth adapter and its capabilities, you might encounter one of two scenarios during the pairing process:
Scenario 1: Numeric Comparison
Some newer Bluetooth adapters support a feature called Numeric Comparison. If your adapter uses this, you may see a screen prompting you to compare pairing codes. In this case, simply ignore the ‘Compare pairing codes’ request, select ‘Yes’, and then click ‘Next’.
Scenario 2: PIN Code Entry (Legacy Bluetooth)
Older Bluetooth adapters might require a PIN code for pairing. If you are given the option to enter a PIN, or to pair without a code, choose the option to enter the PIN and use ‘1234’ as the PIN code. This is the standard PIN for OBDLink devices.
Once the pairing process is complete, Windows will display a confirmation message indicating that OBDLink has been successfully added to your computer.
If the installation is unsuccessful for any reason, simply press the ‘Connect’ button on your OBDLink scanner again (to re-enter pairing mode) and repeat Step 6.
Step 7: Installing the OBDwiz Application on Your PC
With the Bluetooth connection established, the next step to fully add obd scanner to my pc and utilize its capabilities is to install the OBDwiz software. OBDwiz is a diagnostic application designed to work seamlessly with OBDLink scanners, allowing you to interpret the data from your vehicle.
Download the latest version of OBDwiz from the official ScanTool website: Download OBDwiz
Once downloaded, run the OBDwizSetup.exe installer and follow the on-screen instructions to install the software on your Windows PC.
Before proceeding with the software setup, ensure that:
- You have successfully paired your OBDLink scanner with Windows as outlined in the previous steps.
- Your vehicle’s ignition key is still in the ‘On’ position.
Step 8: Initial Software Setup – Auto-Detecting Your OBDLink Scanner
After installing OBDwiz, launch the application. The first time you run OBDwiz, you’ll need to configure it to communicate with your OBDLink scanner. Fortunately, OBDwiz has an ‘Auto Detect’ feature to simplify this process.
In the OBDwiz interface, locate and click the ‘Auto Detect’ button, usually prominently displayed and often circled or highlighted.
Clicking ‘Auto Detect’ initiates a process where OBDwiz automatically scans all known COM ports and baud rate options to identify and configure itself to work correctly with your connected OBDLink adapter.
When the auto-detection process is complete, you should see a dialog box confirming that your OBDLink device has been found and configured.
Step 9: Connecting to Your Vehicle Through OBDwiz
With the initial software setup complete, you are now ready to establish a connection to your vehicle’s computer through the OBDwiz application. This is the final step to effectively add obd scanner to my pc and start accessing vehicle data.
In the OBDwiz interface, find and click the ‘Connect’ button.
Upon clicking ‘Connect’, OBDwiz will begin cycling through various legislated OBD-II protocols to automatically detect which protocol is used by your vehicle. A status screen will be displayed, showing the progress of this automatic protocol detection.
Many modern vehicles have multiple on-board computers (ECUs) that communicate on the OBD-II network. The OBD-II protocol standard allows connection to only one ECU at a time. OBDwiz will typically prompt you to connect to the ECU reporting the most Supported PIDs (Parameter IDs), which generally provides the broadest range of data. You can always reconnect later and select a different ECU if needed. Click ‘Continue’ to proceed with the recommended ECU.
Step 10: Accessing Vehicle Data and Diagnostics
Congratulations! You have successfully add obd scanner to my pc and established a connection to your vehicle’s computer. Now you can begin to explore the wealth of diagnostic and performance data available through OBDwiz.
OBDwiz provides a range of capabilities, including:
- Diagnosing ‘Check Engine’ light trouble codes: Read and clear diagnostic trouble codes (DTCs) to understand and resolve vehicle issues.
- Monitoring real-time vehicle performance: View live data parameters such as engine speed (RPM), coolant temperature, vehicle speed, and much more.
- Checking emissions readiness: Verify your vehicle’s readiness for emissions testing.
- Logging trips: Record vehicle data during your drives for later analysis.
To start exploring these features, click on a task from the navigation menu typically located along the left-hand side of the main OBDwiz screen.
Each task within OBDwiz is further organized into tabs, providing more specific information and actions related to the selected task.
Within each tab, you will find action buttons that allow you to perform specific functions, such as reading codes, clearing codes, starting data logging, and more.
By following these steps, you’ve successfully learned how to add obd scanner to my pc and unlock the power of vehicle diagnostics at your fingertips. Explore the features of OBDwiz and gain valuable insights into your vehicle’s health and performance.