
Microsoft Excel is widely recognized for its data management and calculation capabilities. However, recent versions like Excel 2019 and newer also incorporate a handy feature that lets you express yourself more visually: the Drawing Tool. This feature allows you to write, annotate, and draw directly on your spreadsheets using digital ink, bringing a more intuitive and personal touch to your data interaction.
The Drawing Tool is particularly useful for tasks such as highlighting key figures, jotting down quick notes, or even sketching diagrams directly within your worksheets. If you are a frequent tablet user, this tool will feel remarkably natural, mimicking the experience of writing on paper, but within your digital Excel environment.
Despite its availability, the Drawing Tool isn’t immediately visible in the Excel menu bar by default. It requires a simple activation process to bring it to your fingertips. If you’re looking to leverage this feature, this tutorial will guide you through the steps to make the Drawing Tool accessible in your Excel interface.
Activating the Drawing Tool in Excel: A Step-by-Step Guide
Before proceeding, ensure you are using Microsoft Excel version 2016, 2019, or a newer iteration to have the Drawing Tool feature available.
- Start by opening the Excel application on your computer.
- Navigate to your worksheet and click on the File tab, located in the top-left corner of the Excel window.
- From the File menu, select Options. This action will open the Excel Options dialog box.
- In the Excel Options window, click on the Customize Ribbon tab. On the right side of the dialog, you will see a section labeled “Customize The Ribbon”.
[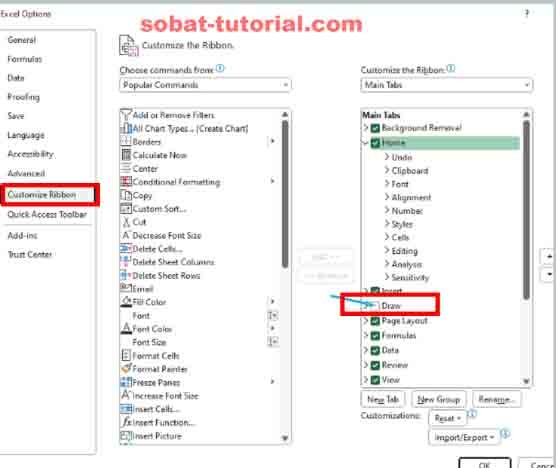 Enable Excel Drawing Tool: Check the 'Draw' box in Excel Options > Customize Ribbon]
- Within the “Customize the Ribbon” section, find and check the box next to Draw.
- Click OK to save the changes and close the Excel Options dialog box.
- That’s it! The Drawing Tool tab will now appear in your Excel menu bar, ready for use.
Drawing and Writing in Excel
With the Drawing Tool enabled, you can now start adding handwritten notes or drawings to your Excel sheets. To begin, simply navigate to the Draw tab in the menu. Here, you will find a selection of pens and highlighters to choose from. You can also customize the color and thickness of your ink to suit your needs.
To start drawing, select your preferred pen type and color, then click and drag your mouse cursor on the worksheet area where you want to draw. If you need to erase any part of your drawing, select the Eraser tool, and click or drag over the ink you wish to remove.
Converting Ink Drawings to Shapes
Excel’s Drawing Tool offers an intelligent feature that allows you to refine freehand drawings by converting them into precise shapes. If you’ve sketched a shape that isn’t perfectly formed, you can easily tidy it up. First, use the Lasso Select tool to select your ink drawing. Then, in the Convert group under the Draw tab, click Ink to Shape. Excel will then transform your freehand drawing into a neater, geometrically accurate shape, based on your initial sketch. This is particularly useful for creating flowcharts or diagrams within Excel.
Final Thoughts
Enabling and utilizing the Drawing Tool in Microsoft Excel can significantly enhance how you interact with your spreadsheets. Whether you need to annotate data, emphasize certain points, or simply prefer a more hands-on approach to digital note-taking, the Drawing Tool provides a versatile solution. Experiment with the different pens, colors, and the ink-to-shape conversion to discover how this feature can streamline your tasks and improve your workflow in Excel.