
Creating a bootable USB drive is a necessary skill for anyone who manages computers, especially when dealing with system maintenance, BIOS updates, or operating system issues. For Dell computer users, the Dell Diagnostic Deployment Package (DDDP) offers a straightforward method to create these essential bootable drives. This guide will walk you through the process of using DDDP to make a USB drive bootable, ensuring you can perform tasks outside of your operating system environment.
This method is particularly useful in scenarios where you need to update your BIOS without a functioning operating system, when you are installing a new OS, or when your computer is unable to boot into the existing OS. Issues like permission conflicts, antivirus software interference, or update schedule incompatibilities can sometimes hinder BIOS updates from within the operating system. Using a bootable USB drive circumvents these potential problems.
It’s important to note that the DDDP method creates a bootable partition of up to 2 GB on your USB flash drive. For larger bootable drives, alternative methods like Diskpart are available, but for basic diagnostic tools and BIOS updates, DDDP is often sufficient and user-friendly.
Let’s delve into the steps required to create your bootable USB drive using DDDP.
Step-by-Step Guide to Creating a Bootable USB Drive with DDDP
-
Download the Dell Diagnostic Distribution Package (DDDP): Navigate to the official download link: https://downloads.dell.com/diags/CW1322A1.exe.
- When the “File Download” window appears, click Run to start the download process.
- You might encounter a “User Account Control (UAC)” prompt. If so, select Yes to authorize the download and installation to proceed.
- The “Dell 32-bit diagnostic” window will open. Click Continue to move to the next step.
- A folder creation window will appear. Click Ok to accept the default folder location for the extracted files.
- A “Dell Diagnostic” dialog box will confirm that “all files were successfully extracted“. Click Ok to close this confirmation. The DDDP main menu will then appear; you can close this window by clicking the X in the upper right corner.
-
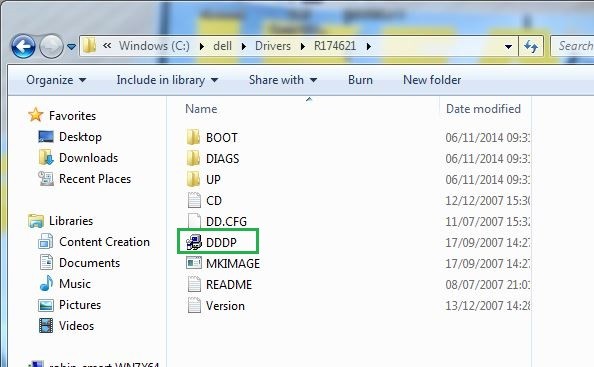
Locate the DIAGS Folder: Go to the directory where DDDP was extracted. The default location is
C:DellDriversR174621. Open this folder and then select the DIAGS folder within it.
-
Clean the DIAGS Directory: Open the DIAGS folder. It’s crucial to remove all files and folders within this directory except for the following essential files:
COMMAND.comDELLBIO.binDELLRMK.binAUTOEXEC.batCONFIG.sys
These files are the core components required to make your USB drive bootable using the DDDP utility for basic system tasks, similar to how specialized tools might be needed for operations like Cara Menggunakan Cmos Password Recovery Tools 3.1 in different contexts, though DDDP is not designed for CMOS password recovery.
-
Insert Your USB Flash Drive: Plug in the USB flash drive you intend to make bootable into an available USB port on your computer.
Warning: Proceed with caution as this step will erase all data currently stored on the USB flash drive. Before continuing, ensure you have backed up any important personal data from the USB drive to another secure storage device. Data loss is irreversible once you proceed with making the drive bootable.
- Run the DDDP Application: Navigate back to
C:DellDriversR174621. Locate and double-click the application named DDDP.
- Install to USB Flash Drive: In the DDDP utility window that appears, select the option Install to a USB flash drive. This action will initiate the process of formatting your USB drive and making it bootable with the necessary files.
-
Restart Your Computer and Access Boot Menu: Once the DDDP utility has completed its process, restart your computer. As soon as the Dell logo appears during startup, press the F12 key repeatedly to enter the One Time Boot Menu. The specific key might vary depending on your Dell model, but F12 is commonly used.
-
Select USB Storage Device: In the Boot Menu, use the arrow keys to navigate and select USB storage device from the list of boot options. Press Enter to boot from the USB flash drive you just prepared.
-
Command Prompt Boot: Your computer will now boot from the USB drive to a command prompt environment. You should see the prompt displayed as C:> indicating a successful boot from the USB drive.
-
Bootable USB Drive Ready: Congratulations, you have successfully created a bootable USB drive using Dell DDDP! You can now use this drive for various purposes, such as running system diagnostics or updating your system BIOS from outside the operating system.
Note: Updating your system BIOS using a USB flash drive is a common application for bootable USB drives created with DDDP. For more detailed information on performing Dell BIOS updates, refer to Dell BIOS Updates. While this guide focuses on creating the bootable USB, remember that tasks like BIOS updates or even more advanced system recovery operations, potentially involving aspects of CMOS settings, are made possible through this foundational step. However, for specific CMOS password recovery, dedicated tools like cara menggunakan cmos password recovery tools 3.1 might be explored, though they are distinct from the DDDP utility and its primary functions.
This bootable USB drive provides a valuable tool in your system maintenance toolkit, enabling you to address various computer issues effectively.