
Paint Tool SAI is a favorite software for many digital artists, especially those venturing into anime and manga-style illustrations. When paired with a Wacom tablet, the drawing experience becomes even more intuitive and enjoyable. This guide will walk you through the basics of sketching in Paint Tool SAI using your Wacom tablet, helping you to get started and make the most of these powerful tools.
Setting Up Your Wacom for Sketching in Paint Tool SAI
Before diving into sketching, it’s important to ensure your Wacom tablet is properly set up to work seamlessly with Paint Tool SAI. This involves a few key adjustments within the software and potentially your tablet driver settings.
Configuring the Pencil Tool
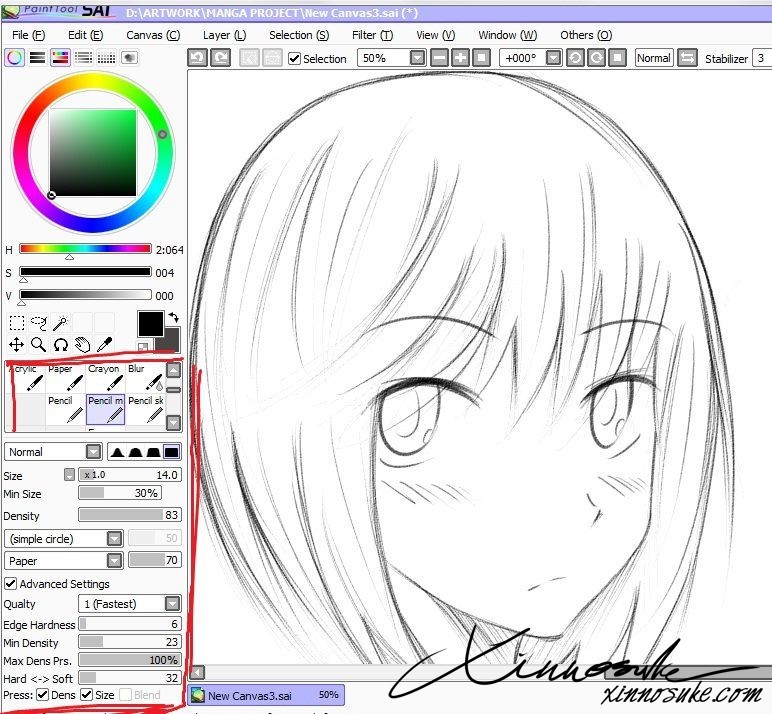
Paint Tool SAI offers a highly customizable interface, allowing you to tailor your tools to your specific needs. For sketching, the pencil tool is your best friend. Here’s how to configure it for a natural pencil-like feel:
- Access Tool Settings: In Paint Tool SAI, locate the toolbar. Right-click in an empty space within the toolbar area.
- Create a New Pencil Tool: From the context menu, select “Pencil”. This will add a new pencil tool to your toolbar.
- Adjust Tool Parameters: Select the newly created pencil tool. In the tool parameters panel, adjust the settings as shown in the image below to mimic the feel of a mechanical pencil. Experiment with settings like ‘Size’, ‘Min Size’, ‘Density’, and ‘Hardness’ to find your preferred sketching style.
Creating a new pencil tool with specific settings for Wacom in Paint Tool SAI to achieve optimal sketching results.
By fine-tuning these settings, you can achieve a digital pencil that responds naturally to your Wacom pen pressure and tilt, making your digital sketching feel more organic.
Optimizing Wacom Bamboo Preferences (For Bamboo Users)
If you are using a Wacom Bamboo tablet, there’s an additional tweak that can enhance your sketching experience. Adjusting the “Tip Feel” in Bamboo Preferences can make your lines smoother and more responsive:
- Open Bamboo Preferences: In your computer’s start menu search bar, type “Bamboo Preferences” and open the application.
- Adjust Tip Feel: Navigate to the “Pen” or “Tip Feel” settings. Move the indicator slightly to the right of the center. This adjustment makes the pen tip feel a bit firmer, resulting in smoother lines, especially beneficial for sketching.
Adjusting the ‘Tip Feel’ in Wacom Bamboo Preferences to achieve smoother lines when sketching in Paint Tool SAI.
Remember to revert these settings back to your default preferences when you are finished sketching if you use your tablet for other tasks that require different sensitivity levels.
Step-by-Step Guide to Sketching Manga in Paint Tool SAI with Wacom
Now that your tools are set up, let’s get into the sketching process. We’ll create a simple manga-style character sketch to illustrate the basic steps.
1. Start with Basic Framework
Every good sketch begins with a basic framework. For a character portrait, start with simple shapes to define the head and body posture.
- Draw a Circle: Begin by drawing a circle to represent the head. Don’t worry about perfection at this stage; these are just guidelines.
- Add Shoulder Lines: Extend lines downwards from the circle to outline the shoulders. This establishes the basic pose and proportions of your character.
Establishing the initial structure of a manga character sketch in Paint Tool SAI with a Wacom tablet by drawing a circle for the head and lines for the shoulders.
2. Define Facial Guidelines
To ensure facial features are correctly placed, draw guidelines within the circle:
- Divide the Circle: Lightly divide the circle both vertically and horizontally. These lines will help you align the eyes, nose, and mouth.
- Eye Line: The horizontal line, often placed slightly below the vertical center, marks the position of the eyes.
Using guidelines in Paint Tool SAI with a Wacom tablet to accurately position facial features in a manga character sketch.
3. Sketch Facial Features
Now, using the guidelines, start sketching the facial features:
- Eyes: Draw the eyes along the eye line. Manga eyes are often large and expressive.
- Mouth and Nose: Position the mouth and nose below the eyes, considering the character’s expression and perspective.
Adding facial features such as eyes and mouth to the manga sketch in Paint Tool SAI with a Wacom tablet, focusing on expression.
4. Add Hair and Details
Bring your character to life by adding hair and other details:
- Hair: Sketch the hairstyle, adding volume and flow. Manga hair can be quite stylized and dynamic.
- Eyebrows: Don’t forget the eyebrows! They are crucial for conveying emotion.
Detailing the manga sketch in Paint Tool SAI with a Wacom tablet by adding hair and eyebrows, enhancing character appearance.
5. Sketch Clothing
Finally, sketch the clothing. For simplicity, we’ll give our character a basic t-shirt:
- Outline Clothing: Sketch the neckline and the basic shape of the t-shirt, following the shoulder lines you established earlier.
- Add Details: Include any folds or details to the clothing to make it look more natural.
Completing the basic manga character sketch in Paint Tool SAI with a Wacom tablet by adding simple clothing details.
6. Refine and Finalize Sketch
Review your sketch and add any final touches:
- Details and Accessories: Add any small details or accessories to enhance the character’s design.
- Clean Up Lines: Lighten or erase unnecessary construction lines to clean up your sketch.
The final sketch of a manga character created in Paint Tool SAI using a Wacom tablet, demonstrating completed linework and overall composition.
You can see the progression of these steps in the following image:
Visual guide showing the step-by-step process of sketching a manga character from initial framework to final sketch using Paint Tool SAI and a Wacom tablet.
Advanced Sketching Tip: Using Layers for Cleaner Lines
For a cleaner and more refined sketch, especially when using a Wacom tablet, utilize layers in Paint Tool SAI:
- Create a New Layer: After your initial rough sketch, create a new layer above it.
- Reduce Opacity of Initial Sketch Layer: Lower the opacity of your initial sketch layer (the one with the basic framework) to below 50%. This will make it lighter and less distracting.
- Sketch on the New Layer: On the new layer, use the pencil tool again to draw cleaner, more defined lines over your rough sketch. This technique allows you to refine your sketch without directly altering the initial framework.
- Hide the Initial Sketch Layer: Once you are satisfied with your refined lines, you can hide the initial sketch layer by clicking the eye icon next to the layer in the layer panel.
Illustrating the use of layers in Paint Tool SAI with a Wacom tablet to achieve cleaner sketches by layering refined lines over a rough sketch.
Canvas Rotation for Comfort
If you find yourself struggling with certain angles while drawing, Paint Tool SAI offers a handy canvas rotation feature:
- Rotate Canvas: Look for the rotate canvas buttons in the interface (usually located near the navigator or view options). Use these to rotate your canvas to a more comfortable drawing angle. This is particularly useful when working on details or long lines.
Using the canvas rotation feature in Paint Tool SAI to improve drawing comfort and precision with a Wacom tablet.
By utilizing canvas rotation, you can avoid awkward wrist positions and maintain a more natural drawing flow.
After refining your sketch with layers and canvas rotation, you can achieve a cleaner and more polished result:
A refined manga character sketch created in Paint Tool SAI using layers and canvas rotation with a Wacom tablet, showcasing cleaner lines and improved details.
Saving Your Work
Remember to save your work regularly. To save your sketch in Paint Tool SAI format:
- Go to File > Save As.
- Choose SAI File Type: In the “Save As” dialog box, select “.SAI” as the file type.
- Name Your File: Enter a name for your file and click “Save.”
Saving in SAI format preserves layers and all your work in a format that can be easily reopened and edited in Paint Tool SAI.
Conclusion
Sketching in Paint Tool SAI with a Wacom tablet is a fantastic way to begin your digital art journey, especially if you’re interested in manga and anime styles. By understanding the basic tool settings, utilizing layers, and practicing these step-by-step techniques, you’ll be well on your way to creating your own digital masterpieces. Experiment with different pencil settings and brush types to discover your unique style. Happy sketching!