
Are you diving into the world of graphic design and looking to get to grips with Adobe Photoshop CS4? Photoshop is a powerhouse of tools for editing and manipulating images, and understanding its core functionalities is crucial. Among these, the Magic Wand Tool stands out as a remarkably efficient selection tool, especially for beginners. While the original article you referenced touched upon various Photoshop tools, we’re going to zero in on mastering the Magic Wand Tool in Photoshop CS4, providing you with a detailed guide that surpasses the initial overview.
Understanding the Magic Wand Tool
The Magic Wand Tool is your go-to selection tool in Photoshop when you need to select areas of an image based on color and tone. Imagine you have an image with a solid color background, and you want to isolate the main subject. The Magic Wand Tool makes this process incredibly quick and easy. Instead of painstakingly tracing around the subject, you can simply click on the background color, and the Magic Wand will intelligently select areas with similar color ranges.
Think of it like this: you’re pointing a “magic wand” at a color, and Photoshop magically selects everything that looks similar! This is incredibly useful for tasks like:
- Removing backgrounds: Quickly select and delete or replace backgrounds in photos.
- Isolating objects: Select objects to change their color, apply effects, or move them to different backgrounds.
- Making targeted adjustments: Select specific color ranges to adjust brightness, contrast, or color saturation in those areas only.
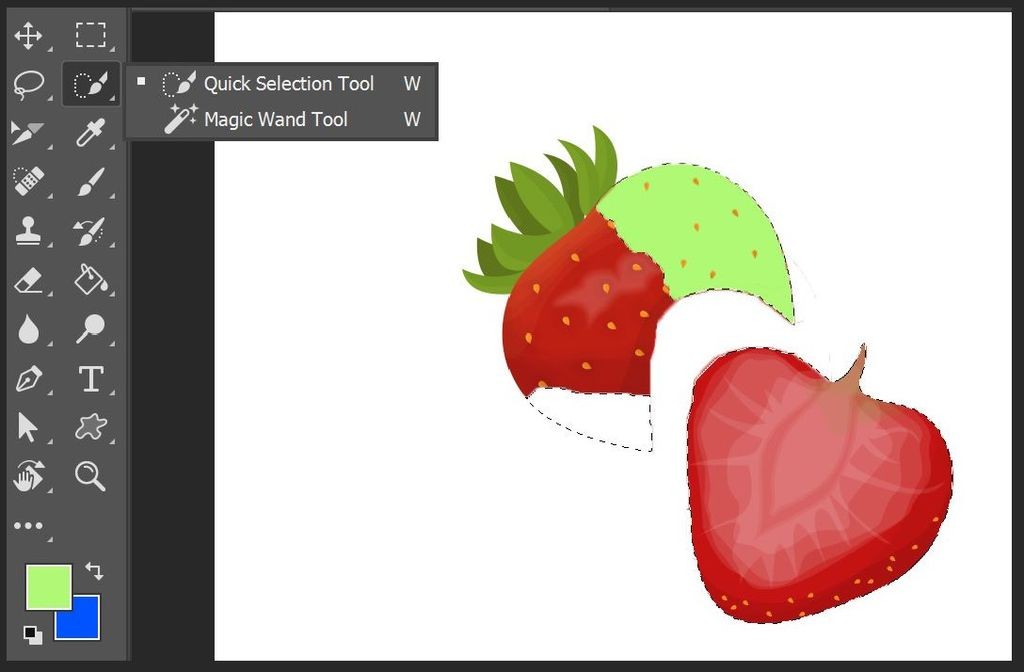
Locating the Magic Wand Tool
In Photoshop CS4, you can find the Magic Wand Tool in the Tools panel, which is typically located on the left side of your workspace. It’s often grouped with the Quick Selection Tool. Look for an icon that resembles a wand with sparkles emanating from its tip.
You can also quickly activate the Magic Wand Tool by pressing the W key on your keyboard. This shortcut can significantly speed up your workflow as you become more comfortable with Photoshop.
How to Use the Magic Wand Tool in Photoshop CS4: A Step-by-Step Guide
Let’s break down how to effectively use the Magic Wand Tool to make selections based on color similarity:
-
Select the Magic Wand Tool: Click on the Magic Wand Tool icon in the Tools panel (or press ‘W’).
-
Adjust Tolerance: At the top of your Photoshop window, in the Options Bar, you’ll see a setting called Tolerance. This is a crucial setting for controlling how much color variation the Magic Wand will select.
- Lower Tolerance (e.g., 0-30): Selects only colors very similar to the color you click on. This is useful for images with distinct color differences.
- Higher Tolerance (e.g., 30-100+): Selects a wider range of colors similar to the color you click on. This is helpful for images with subtle color gradients or variations.
Experiment with different Tolerance values to see how they affect your selections. Start with a lower value and increase it gradually until you achieve the desired selection.
-
Click to Select: Click on the area of your image that you want to select based on color. The Magic Wand will immediately select pixels that fall within the Tolerance range you’ve set, based on the color you clicked on.
-
Understanding Selection Modes: In the Options Bar, you’ll also see selection mode icons. These determine how subsequent clicks with the Magic Wand interact with your existing selection:
- New Selection (Default): Each click starts a brand new selection, replacing any previous selection.
- Add to Selection (Shift + Click): Click to add more areas to your current selection. You can also hold down the Shift key while clicking.
- Subtract from Selection (Alt/Option + Click): Click to remove areas from your current selection. Hold down the Alt or Option key while clicking.
- Intersect with Selection (Shift + Alt/Option + Click): Selects only the areas that are common to both the new click and the existing selection. Hold down both Shift and Alt/Option keys while clicking.
-
Contiguous vs. Non-contiguous: Another important setting in the Options Bar is Contiguous.
- Contiguous Checked: The Magic Wand will only select areas that are adjacent or connected to the pixel you initially clicked on, and that fall within the Tolerance range. This is useful for selecting a specific object surrounded by other colors.
- Contiguous Unchecked: The Magic Wand will select all pixels throughout the entire image that fall within the Tolerance range, regardless of whether they are connected to your initial click or not. This is useful for selecting all instances of a particular color across the entire image.
-
Refine Your Selection: After your initial Magic Wand selection, you may need to refine it. You can use the “Add to Selection” and “Subtract from Selection” modes, along with adjusting the Tolerance, to precisely tune your selected area. For more complex selections, you might consider using the “Refine Edge” feature (found in the Options Bar after making a selection) to smooth edges and improve selection accuracy, although this is a more advanced technique.
Tips and Tricks for Effective Magic Wand Use
- Start with Low Tolerance: Begin with a lower Tolerance value and gradually increase it if the initial selection is too limited. It’s easier to add to a selection than to subtract from an overly broad one.
- Zoom In: Zoom in on your image (Ctrl/Cmd + +) for more precise clicking and to better assess the selection edges.
- Use Selection Modes Strategically: Mastering “Add to Selection” and “Subtract from Selection” is key to building complex selections using the Magic Wand.
- Consider Image Quality: The Magic Wand works best on images with clear color separation and well-defined edges. Low-quality images or those with blurry edges may require more manual refinement or alternative selection tools.
- Combine with Other Tools: Don’t be afraid to combine the Magic Wand with other selection tools like the Lasso Tools or Quick Selection Tool for more complex selection tasks. For example, you might use the Magic Wand for the initial broad selection and then use a Lasso Tool to clean up the edges.
Common Issues and Troubleshooting
- Over-selection: If the Magic Wand selects too much of the image, reduce the Tolerance value. Ensure Contiguous is checked if you only want to select connected areas.
- Under-selection: If the Magic Wand doesn’t select enough, increase the Tolerance value. Uncheck Contiguous if you need to select all instances of a color throughout the image.
- Jagged Edges: For selections with rough edges, explore the Refine Edge feature for smoothing and feathering options.
Beyond the Magic Wand: Exploring Other Selection Tools
While the Magic Wand is excellent for color-based selections, Photoshop CS4 offers a range of other selection tools, each suited for different scenarios. As mentioned in the original article, tools like the Marquee Tools, Lasso Tools, and Quick Selection Tool provide alternative methods for selecting areas based on shape, freehand drawing, or object recognition. Understanding when to use each tool is part of becoming proficient in Photoshop.
Image: The Crop Tool example image from the original article is included to subtly broaden the context, reminding users that Photoshop has a diverse toolkit beyond just selection tools.
Conclusion
The Magic Wand Tool is a powerful and time-saving tool in Photoshop CS4 for making selections based on color. By understanding its settings like Tolerance and Contiguous, and by practicing its use in different selection modes, you can efficiently isolate objects, remove backgrounds, and perform targeted edits. While mastering the Magic Wand Tool is a great starting point, remember that Photoshop offers a vast array of tools to explore. Continue experimenting and learning to unlock the full creative potential of this industry-leading software!