The Tape Measure Tool in SketchUp is more than just a measuring utility; it’s a cornerstone for precision and accuracy in 3D modeling. Whether you’re drafting architectural marvels or crafting simple 3D objects, understanding how to effectively use the Tape Measure Tool is crucial. In this guide, we’ll not only explore the functionalities of this indispensable tool but also apply it practically by creating a 3D pencil model in SketchUp. This hands-on project will illuminate the power and versatility of the Tape Measure Tool, ensuring you can leverage it in all your future SketchUp endeavors.
Understanding the Tape Measure Tool in SketchUp
The Tape Measure Tool (represented by an icon resembling a tape measure in the toolbar) serves multiple vital functions in SketchUp:
- Accurate Measurement: Primarily, it allows you to measure distances between points with precision, ensuring your model’s dimensions are exact.
- Guide Creation: Beyond measuring, this tool is instrumental in creating construction lines and guide points. These non-printing guidelines are invaluable for aligning objects, establishing reference points, and ensuring geometric accuracy without cluttering your final model.
- Model Scaling: The Tape Measure Tool can also be used to scale your entire model or parts of it, maintaining proportions while adjusting overall size.
For beginners and seasoned SketchUp users alike, mastering the Tape Measure Tool unlocks a new level of control and precision in 3D modeling. Let’s dive into a practical example to see it in action.
Project: Crafting a 3D Pencil Model Using the Tape Measure Tool
In this project, we will create a 3D pencil model in SketchUp, specifically focusing on how the Tape Measure Tool aids in precise construction. We’ll use the “Simple Template: Meters” in SketchUp for this tutorial. Here are the tools we’ll be utilizing, with the Tape Measure Tool highlighted:
| Tools for 3D Pencil Creation |
|---|
| Tools used in creating a 3D pencil in SketchUp |
Follow these steps to create your 3D pencil model:
Step 1: Laying the Foundation – The Pencil Body
- Activate the Circle Tool (3).
- Click on the origin point to start your circle.
- Enter a radius of
0.2meters and press Enter. This will create the circular base of our pencil.
Step 2: Extruding the Cylinder
- Select the Push/Pull Tool (5).
- Click on the circle you just created.
- Drag upwards to extrude the circle into a cylinder.
- Enter a height of
6meters and press Enter. This forms the main wooden body of the pencil.
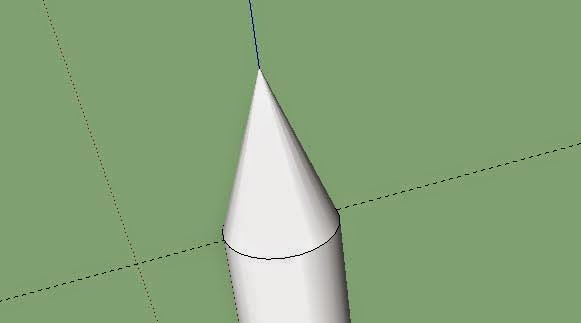
Step 3: Precision Point – Using the Tape Measure Tool for Cone Creation
This is where the Tape Measure Tool (6) becomes essential. We need to create a precise guide to form the conical tip of the pencil.
- Select the Tape Measure Tool.
- Hover over the top circular face of the cylinder. Notice how the tool snaps to the center point.
- Click on the center point and drag upwards along the blue axis. This creates a guideline extending vertically from the center.
- Type
0.6and press Enter. This sets a guide point 0.6 meters above the top face, marking the apex of our pencil’s cone. This precise measurement is made possible by the Tape Measure Tool.
| Guiding Cone Creation with Tape Measure Tool |
|---|
| Using the Tape Measure Tool to set a precise guide point for the pencil tip |
Step 4: Shaping the Pencil Tip – Creating the Cone
- Select the Pencil Tool (1).
- Click on the center point of the top circle (where you started the guideline).
- Move your cursor to the guide point you just created (0.6 meters above) and click.
- Now, click on a point on the edge of the top circle’s circumference.
- Finally, click back on the center point of the circle to close the triangular face. You’ve created a triangle that will help form the cone.
Step 5: Forming the Cone with Follow Me Tool
- Navigate to Tools > Follow Me in the SketchUp menu.
- Click on the triangular face you just drew.
- With the mouse button still pressed, carefully drag your cursor around the circumference of the top circle. As you drag, the triangular face will be extruded along the circular path, forming a perfect cone.
- Release the mouse button when the cone is complete.
| Pencil Tip Shaping Process |
|---|
| Creating the pencil tip cone using the Follow Me tool in SketchUp |
Step 6: Shaping into a Hexagonal Pencil Body
Standard pencils aren’t cylindrical; they’re hexagonal (or sometimes polygonal). Let’s refine our pencil body.
- Activate the Polygon Tool (4).
- Click on the center point of the bottom face of the cylinder.
- Before clicking again to set the radius, type
6and press Enter to specify 6 sides for the polygon. - Click to set a radius – it should be roughly the same size as the circle base.
Step 7: Extruding the Hexagon
- Select the Push/Pull Tool (5).
- Click on the hexagonal face you just created.
- Push/Pull the hexagon upwards, almost to the pencil’s tip, leaving the cone untouched.
| Polygonal Shaping of Pencil Body |
|---|
| Transforming the cylindrical pencil body into a polygonal shape |
Step 8: Refining and Cleaning Up
- Select the five remaining cylindrical faces and the top face that intersects with the cone.
- Right-click and choose Intersect Faces > With Model.
- Now, delete the excess cylindrical parts that extend beyond the hexagonal shape, the polygonal face covering the cone’s tip, and the polygon face at the bottom.
- Use the Pencil Tool (1) to draw a line across the bottom hexagonal opening, connecting midpoints of opposite sides. This will automatically close the bottom face, making it solid.
Step 9: Adding Detail – The Pencil Band
To add a realistic detail, we’ll create a band near the bottom of the pencil.
- Use the Rectangle Tool (2).
- Draw a rectangle on the lower part of the pencil body, encircling it where you want the band to be.
- Right-click on the rectangle and choose Intersect Faces > With Model.
- Delete the rectangular face. This engraves a line around the pencil, defining the band area.
| Adding Pencil Band Detail |
|---|
| Using the Rectangle tool to define the pencil band detail |
Step 10: Coloring and Finishing
- Activate the Paint Bucket Tool (7).
- Choose colors for the different parts of the pencil – wood body, graphite tip, and the band.
- Apply the colors to the respective faces of your 3D pencil model.
Your 3D pencil model is now complete! You can view the final result, similar to the first image in this guide.
Conclusion: Tape Measure Tool – Your Precision Partner in SketchUp
This tutorial demonstrated not just how to create a 3D pencil, but more importantly, how to effectively use the Tape Measure Tool in SketchUp for precision modeling. By creating guidelines and measuring accurately, you can ensure the dimensional integrity of your designs. The Tape Measure Tool is fundamental for any SketchUp user aiming for professional-level accuracy. Practice using it in various projects to fully integrate it into your 3D modeling workflow.
For further learning, explore more advanced techniques using the Tape Measure Tool, such as scaling models and creating complex guide systems. Mastering this tool will significantly enhance your SketchUp skills and open up new possibilities in your 3D creations.