Setting up your wireless peripherals, like a Dell wireless mouse and keyboard, should be a straightforward process, ensuring seamless interaction with your computer. Just like having the right tools for car maintenance, such as a Charger Battery Car Mac Tools Bch 7120 Flashing Light for diagnostics, proper setup of your input devices is crucial for optimal performance. This guide will walk you through the steps for installing batteries and pairing your Dell wireless mouse and keyboard using both a USB dongle and Bluetooth connections.
Installing Batteries in Your Wireless Mouse
-
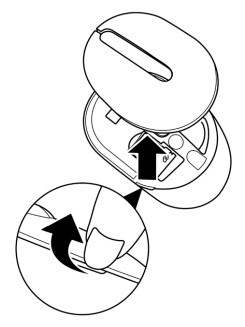
Access the Battery Compartment: Locate the designated slot on the side of your mouse cover. Gently use your fingertip or a similar tool to pry open the cover and access the battery compartment.
-
Retrieve the USB Dongle: Before installing the battery, check if a USB dongle is stored inside the battery compartment. Remove the dongle and set it aside for later use if you plan to connect via USB.
-
Insert the Battery: Place an AA battery into the battery compartment, ensuring you align the positive (+) and negative (-) ends according to the markings inside the compartment.
-
Close the Mouse Cover: Carefully replace the mouse cover, ensuring it clicks or snaps securely back into place.
-
Power On the Mouse: Locate the power switch, usually on the bottom of the mouse, and slide it to the “On” position.
Important Note: Maintain a distance of fewer than 10 meters (33 feet) between your computer and the mouse for optimal wireless performance.
Pairing Your Wireless Mouse
Pairing with the USB Dongle
Note: Your Dell wireless mouse is typically pre-paired with its USB dongle at the factory. In most cases, simply plugging in the dongle will establish the connection.
-
Connect the USB Dongle: Insert the Dell Universal USB dongle into an available USB port on your computer.
-
Connection Confirmation: Observe the connection-mode light on your mouse. It should illuminate briefly to indicate successful pairing with the dongle and then turn off.
-
Mouse Ready to Use: Once the connection light goes off, your mouse is successfully paired and ready for use with your computer.
Pairing via Bluetooth
Supported Models: Bluetooth pairing is applicable to Dell wireless mouse models including KM7210W, MS3320W, MS5120W, and MS5320W.
Pre-requisite: Ensure your computer’s Bluetooth drivers are updated to the latest version for stable connectivity.
-
Enable Bluetooth Pairing Mode: Press the connection-mode button on your mouse twice within 3 seconds. The connection-mode light will illuminate, indicating the first Bluetooth channel is selected.
-
Bluetooth Discovery Mode: The connection-mode light will start blinking for up to 3 minutes, signaling that your mouse is in Bluetooth pairing mode and discoverable by your computer.
-
Pair in Windows Settings:
a. Open Windows Search and type “Bluetooth”.
b. Select “Bluetooth and other devices settings” to open the Settings window.
c. Ensure Bluetooth is toggled to the “On” position.
d. In the “Other devices” section, locate and click “Dell Mouse”.Note: If “Dell Mouse” is not listed, double-check that the mouse is in pairing mode (light blinking).
-
Confirm Pairing: Follow any on-screen prompts to confirm the pairing process on both your computer and the mouse if required.
-
Pairing Completion: The connection-mode light will turn solid white for a few seconds to confirm successful pairing and then turn off. Your mouse will now automatically connect to your computer via Bluetooth when both devices have Bluetooth enabled and are within range.
Pairing with a Second Bluetooth Computer
Supported Models: Pairing with a second Bluetooth computer is supported on models like KM7210W and MS5320W.
-
Select Second Bluetooth Channel: Press the connection-mode button on your mouse twice within 3 seconds to select the second Bluetooth channel. The connection-mode light will indicate the second Bluetooth channel is active.
-
Second Bluetooth Pairing Mode: The connection-mode light will blink, confirming that the second Bluetooth channel is in pairing mode.
-
Pair with Second Computer: Repeat steps 3 and 4 from the “Pairing via Bluetooth” section above on your second Bluetooth-enabled computer to complete the pairing process for the second device.
Installing Batteries in Your Wireless Keyboard
-
Remove Battery Cover: Locate and remove the battery cover on your Dell wireless keyboard. The location may vary slightly depending on the model.
-
Insert Batteries: Install the required AA batteries into the battery compartment, paying attention to the correct polarity (+ and -) as indicated in the compartment.
-
Replace Battery Cover: Securely reattach the battery cover to the keyboard.
-
Power On Keyboard: Locate the power switch on the keyboard, typically on the side or back, and slide it to the “On” position.
Important Note: Ensure the keyboard is within 10 meters of your computer for optimal wireless connection.
Pairing Your Wireless Keyboard
Pairing with the USB Dongle
Note: Dell wireless keyboards are generally pre-paired with the USB dongle.
-
Insert USB Dongle: Plug the Dell Universal USB dongle into a USB port on your computer.
-
Connection Indication: The connection-mode light on the keyboard will illuminate briefly to indicate pairing and then turn off.
-
Keyboard Ready: Your keyboard is now paired and ready to use with your computer.
Pairing via Bluetooth
Pre-requisite: Ensure the latest Bluetooth drivers are installed on your computer.
-
Enable Bluetooth Pairing Mode: Press the connection-mode button on the keyboard twice within 3 seconds to select the first Bluetooth channel. The connection-mode light will turn on.
-
Pair in Windows Settings:
a. Open Windows Search and type “Bluetooth”.
b. Select “Bluetooth and other devices settings”.
c. Click “Add Bluetooth or other device” and ensure Bluetooth is enabled.
d. From the list of devices, select “Dell Keyboard”.Note: If the keyboard is not listed, verify that it is in pairing mode.
-
Confirm Pairing: Follow the on-screen instructions to confirm the pairing process.
-
Pairing Completion: The Bluetooth connection light will turn solid white for 3 seconds to confirm pairing and then turn off. The keyboard will automatically connect via Bluetooth when in range and Bluetooth is enabled on both devices.
Pairing with a Second Bluetooth Computer
Supported Models: Second Bluetooth computer pairing is supported on models like KM7120W.
-
Select Second Bluetooth Channel: Press the connection-mode button twice to select the second Bluetooth channel for pairing with another computer.
-
Pair with Second Computer: Repeat steps 2 and 3 from the “Pairing via Bluetooth” section on your second computer to complete the pairing process for the second device.
Troubleshooting Common Issues
| Problem | Possible Causes | Possible Solutions