
The Smartfren Andromax U, a rebranded Innos i6, was a popular budget-friendly smartphone. For users looking to gain more control over their device, rooting and installing a custom recovery like ClockworkMod Recovery (CWM) were common procedures. This guide provides a comprehensive tutorial on how to root your Smartfren Andromax U, install CWM recovery, and even troubleshoot bootloop issues.
First, let’s revisit the specifications of the Smartfren Andromax U to understand its capabilities:
Smartfren Andromax U Specifications:
| Feature | Specification |
|---|---|
| Network | Dual On EVDO + GSM, CDMA 2000 1x EVDO Rev A 800/1900MHz + GSM GPRS, EDGE, EVDO Rev. A up to 3.1 Mbps, WiFi 802.11 b/g/n, WiFi Hotspot, Bluetooth v3.0 with A2DP, Micro RUIM CDMA + SIM GSM Enabled |
| Hardware | Processor: Dual Core 1.2 Ghz Qualcomm Snapdragon MSM8625, GPU: Adreno GPU 203, RAM: 768MB, Internal Storage: 4GB, Micro SD Card slot up to 32GB, Screen: 4.5″ IPS Display – 540x960pixels (256 ppi pixel density) Capacitive 5 Multi-Touch Screen |
| Video & Camera | Dual Camera: Back – 8 Megapixel Autofocus with LED Flash (3264 x 2448), Front – 2 Megapixel, Video Recorder: HD 720p (3gp, mp4) |
| Sensor | Compass, GPS |
| Other | Micro-USB 2.0, Audio Jack 3.5mm output, Battery: Li-Ion 1800 mAh, OS: Jelly Bean 4.1.2 |

Now, let’s dive into the tutorials.
How to Root Your Andromax U
Rooting your Android device gives yousuperuser access, allowing for deeper customization and control over your phone’s operating system. Here are two methods to root your Smartfren Andromax U:
Method 1: Using Framaroot
Framaroot is a one-click rooting application that simplifies the rooting process.
Steps:
- Install Framaroot v.1.6.1: Download the Framaroot APK and install it on your Andromax U. You may need to enable “Unknown sources” in your device’s security settings to install apps from outside the Google Play Store.
- Choose SuperSU: Open Framaroot and select “SuperSU” from the available options. This will install SuperSU, a popular root management application.
- Select Gandalf exploit: Choose the “Gandalf” exploit from the list.
- Restart: After the exploit runs, restart your Smartfren Andromax U.
- Verify Root Access: Use a root checker application, or the Andromax Tool, to confirm if your device is successfully rooted. Look for root status confirmation within the app.
Method 2: Through Android System Recovery
This method involves flashing a pre-rooted ZIP file through the stock recovery.
Steps:
-
Download Rooted_JB_MaxU_pnormal.zip: Download the
Rooted_JB_MaxU_pnormal.zipfile. -
Place on SD Card: Copy the downloaded ZIP file to the root directory of your SD card (not inside any folder).
-
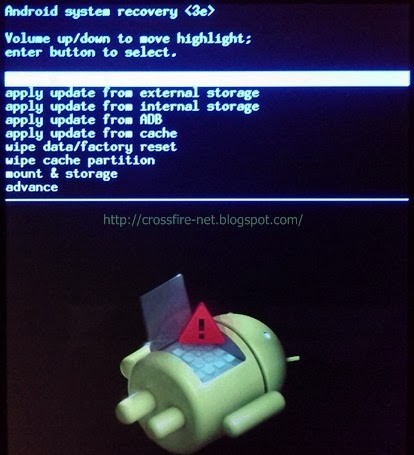
Enter Android System Recovery: Turn off your phone. Press and hold the Power button + Volume Up button simultaneously to boot into Android System Recovery.
-
Disable Signature Verification: In the recovery menu, navigate to “advance” and then select “enable verification signature” until it changes to “disable verification signature”. This step is crucial to allow installation of unsigned ZIP files.
-
Apply Update from External Storage: Go back to the main recovery menu and select “Apply update from external storage”.
-
Select Rooted ZIP File: Choose the
Rooted_JB_MaxU_pnormal.zipfile from your SD card. -
Reboot: Once the installation is complete, select “reboot system now”.
-
Check for SuperSU: After rebooting, check your app drawer for the SuperSU application. If it’s there, your Andromax U is successfully rooted. You can also use a root checker app or Andromax Tool to verify root status.
How to Install Custom Recovery (CWM) on Andromax U
Custom recoveries like ClockworkMod Recovery (CWM) offer advanced options compared to the stock recovery, including backup and restore functionalities, custom ROM installation, and more.
Install via Shell Command
This method utilizes Terminal Emulator to flash CWM recovery.
Steps:
-
Install Terminal Emulator: Download and install a Terminal Emulator application from the Google Play Store.
-
Download CWM Recovery Image: Download the CWM recovery image file (
cwm-maxu-le-fix.img) specifically for Andromax U. -
Place CWM Image on SD Card: Copy the downloaded
cwm-maxu-le.imgfile to the root directory of your SD card. -
Open Terminal Emulator: Launch the Terminal Emulator application.
-
Backup Stock Recovery (Optional but Recommended): It’s wise to back up your stock recovery in case you need to revert later. Type the following commands in the terminal, pressing Enter after each line:
su
dd if=/dev/block/mmcblk0p16 of=/sdcard/recovery.img
Grant root permissions if prompted by SuperSU. This will create a
recovery.imgfile on your SD card, which is your stock recovery backup. Keep this file safe. -
Flash CWM Recovery: To install CWM, type the following commands in the terminal, pressing Enter after each line:
su
dd if=/sdcard/cwm-maxu-le.img of=/dev/block/mmcblk0p16
Again, grant root permissions if prompted. This command flashes the CWM recovery image to your device’s recovery partition.
-
Reboot into CWM Recovery: To boot into CWM recovery, turn off your phone and then press and hold the Volume Up + Power buttons simultaneously. You should now boot into ClockworkMod Recovery.
-
Restore Stock Recovery (If Needed): If you ever need to revert back to the stock recovery, use the following commands in Terminal Emulator:
su
dd if=/sdcard/recovery.img of=/dev/block/mmcblk0p16
(Make sure
recovery.img– your stock recovery backup – is still on your SD card).
Tutorial to Fix Bootloop
A bootloop occurs when your device continuously restarts without fully booting into the operating system, often getting stuck at the manufacturer’s logo. This can happen after flashing custom ROMs or system modifications. Here’s how to potentially fix a bootloop on your Andromax U.
Prerequisites:
- A USB data cable (preferably a good quality one).
- A computer.
- ADB Driver Installer.
- ADB and Fastboot tools.
Steps:
-
Download ADB Driver Installer: Download the
AdbDriverInstaller.rarfile. This tool helps in properly installing ADB drivers for your Andromax U on your computer. -
Connect Phone to Computer: Connect your Smartfren Andromax U to your computer using the USB cable.
-
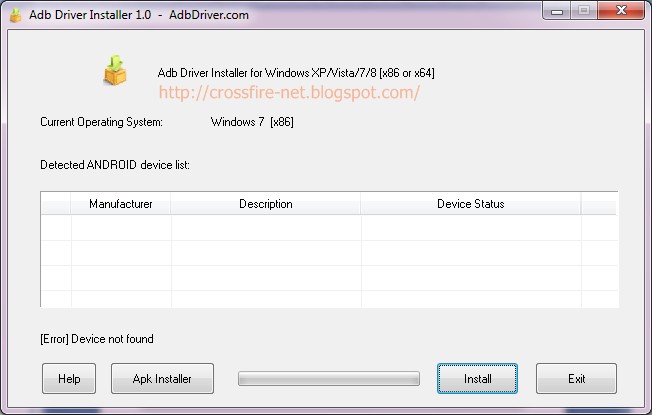
Run ADB Driver Installer: Extract the downloaded
AdbDriverInstaller.rarfile and runAdbDriverInstaller.exe. -
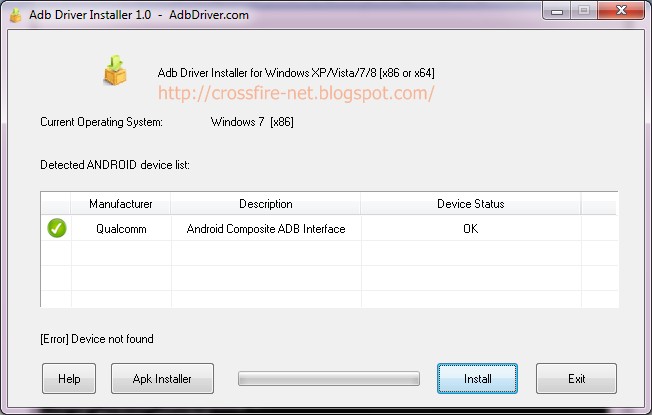
Install Drivers: Click the “Install” button in the ADB Driver Installer. Follow any on-screen prompts to complete the driver installation.
-
Extract ADB and Fastboot Tools: Download and extract the
adb+recovery.rarfile to a folder named “adb” on your C: drive (e.g.,C:adb). This makes it easier to access via the command prompt. -
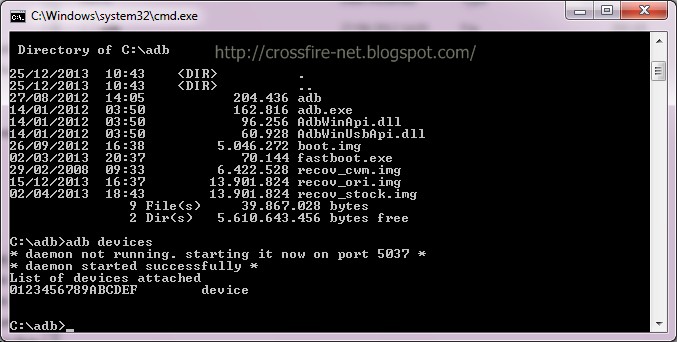
Open Command Prompt: Open Command Prompt as an administrator. Navigate to the
C:adbdirectory by typingcd C:adband pressing Enter. -
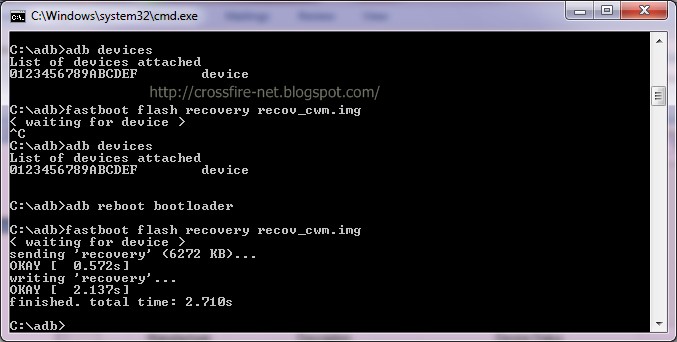
Check Device Connection: Type
adb devicesand press Enter. If your device is properly connected and drivers are installed, you should see your device listed. -
Flash Recovery using Fastboot: Type the command
fastboot flash recovery recov_cwm.imgand press Enter. This command assumes you have a CWM recovery image file namedrecov_cwm.imgin theC:adbfolder. Wait patiently; the process may take a few moments. -
Reboot and Enter Recovery: Once the flashing process is complete (you’ll see a “finished” message), disconnect your phone from the computer, remove and reinsert the battery. Then, boot into recovery mode (Power + Volume Up). From CWM recovery, you can attempt to install a ROM or perform a factory reset to resolve the bootloop.
By following these steps, you can root your Smartfren Andromax U, install a custom recovery, and troubleshoot bootloop issues, gaining greater control and flexibility over your device. Remember to proceed with caution and ensure you are downloading files from trusted sources.