For any website owner, whether for a business or a personal blog, getting your site noticed is a top priority. One of the most effective ways to increase your website’s visibility is to rank well in search engine results. And to achieve this, registering your website with Google Search Console (formerly Google Webmaster Tools) is a crucial first step.
Why is Google Search Console so important for boosting your website’s search performance? Simply put, Google is the dominant search engine today. While other search engines exist, Google has become synonymous with online search for most internet users. Think about your own habits – when you need information, you likely “Google it.” This makes it essential for business websites, online stores, and personal blogs to be easily found on Google. Being indexed by Google is the key, and Google Search Console helps you get there faster and more efficiently.
So, how do you actually register your website with Google Search Console? In this guide, we’ll walk you through the steps to set up Google Search Console for your WordPress website and unlock its potential to improve your site’s search engine ranking. Let’s dive in.
Why Google Search Console is Crucial for Your WordPress Site
Before we jump into the “how-to,” let’s understand why Google Search Console is indispensable for your WordPress website. It’s more than just a tool for submitting your website to Google; it’s a comprehensive dashboard providing invaluable insights and control over your site’s presence in Google Search. Here’s what Google Search Console empowers you to do:
- Ensure Google Can Find and Index Your Site: Submitting your sitemap to Google Search Console helps Google discover and crawl all the pages on your website, ensuring they are included in Google’s index. This is fundamental for your site to appear in search results.
- Identify and Fix Crawl Errors: Google Search Console alerts you to any errors Google encounters while crawling your site. This could include broken links, server errors, or issues with your robots.txt file. Addressing these errors is crucial for optimal indexing and user experience.
- Monitor Your Search Performance: Gain insights into how your website is performing in Google Search. Track your site’s impressions, clicks, average ranking position, and click-through rate (CTR) for different keywords. This data helps you understand what’s working and what needs improvement in your SEO strategy.
- Discover Keyword Opportunities: See the actual search queries that are driving traffic to your site. Identify new keyword opportunities to target and optimize your content for.
- Mobile Usability and Speed Insights: Google Search Console provides reports on your website’s mobile usability and page speed on mobile and desktop. These are critical factors for both user experience and search ranking, especially with Google’s mobile-first indexing approach.
- Security Issues Detection: Google Search Console flags any security issues detected on your website, such as malware or hacking. Promptly addressing these issues is vital for maintaining user trust and your site’s reputation.
In essence, Google Search Console acts as a direct line of communication with Google about your website. It provides the data and tools you need to optimize your site for search, troubleshoot issues, and ultimately, improve your online visibility.
Step-by-Step Guide to Setting Up Google Search Console on WordPress
Now, let’s get to the practical part – setting up Google Search Console for your WordPress website. Follow these steps:
Step 1: Go to Google Search Console
Open your web browser and navigate to the Google Search Console website: Google Search Console.
Step 2: Sign In or Sign Up
You’ll need a Google account to use Search Console. If you already have a Gmail account or use other Google services, sign in with those credentials. If not, click on “Start now” and follow the prompts to create a new Google account.
Step 3: Add Your WordPress Website Property
Once you’re signed in, you’ll be presented with two property types to choose from: Domain and URL prefix.
- URL prefix (Recommended for most users): This option is simpler and verifies only the specific URL prefix you enter (e.g.,
https://yourwebsite.comorhttps://www.yourwebsite.com). Choose this if you primarily use one version of your website URL (either with or without “www”). - Domain: This option verifies ownership at the DNS level, covering all URL prefixes (http://, https://, www., and non-www). It’s more comprehensive but requires DNS record modification.
For most WordPress users, especially beginners, the “URL prefix” option is recommended for its ease of use.
Enter your website’s URL in the “URL prefix” field, making sure to include either http:// or https:// depending on your site’s security certificate (SSL). For example: https://yourwebsite.com.
Click “Continue”.
Step 4: Verify Your Website Ownership
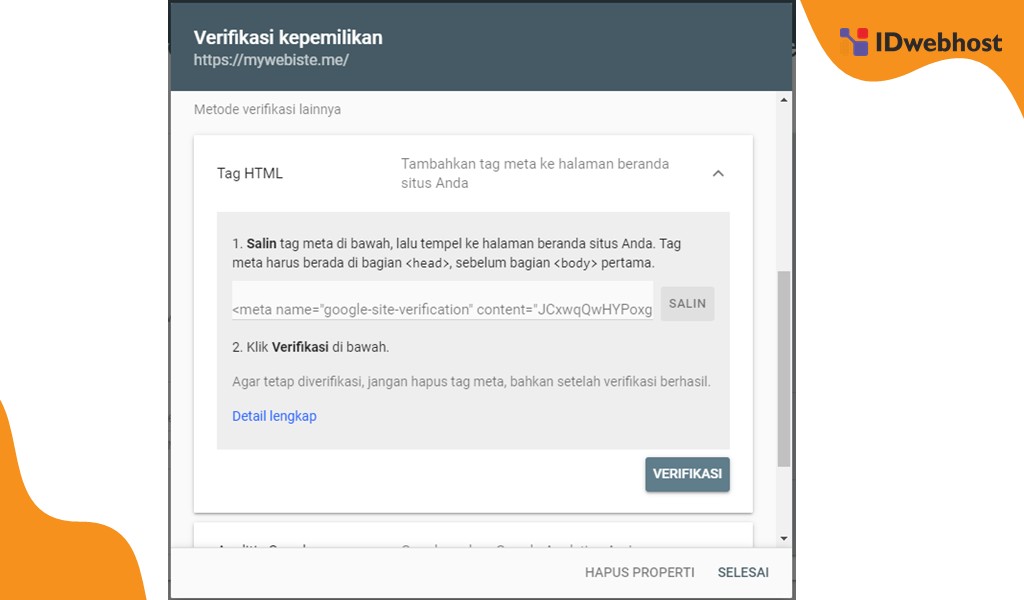
Google needs to verify that you are the actual owner of the website you’re adding to Search Console. You’ll be presented with several verification methods. The most common and straightforward method for WordPress users is “HTML tag”.
Select the “HTML tag” method. Google will provide you with a unique HTML code snippet.
Important: Keep this verification page open, as you’ll need to return to it after adding the HTML tag to your website.
Step 5: Install the Verification Code on Your WordPress Site
Now, you need to add the HTML tag provided by Google to the <head> section of your WordPress website’s homepage. There are a few ways to do this:
Manual Method (Using Theme Editor)
Caution: Directly editing your theme files can be risky if not done carefully. It’s recommended to back up your website before making any changes to your theme files.
- Log in to your WordPress dashboard.
- Navigate to Appearance > Theme Editor.
- On the right-hand side, locate and select your theme’s header file, usually named
header.php. - Find the
<head>tag in the code. - Paste the HTML verification code that you copied from Google Search Console immediately after the
<head>tag. - Click the “Update File” button to save your changes.
Using WordPress Plugins (Recommended)
Using a plugin is a safer and often easier method to add the verification code, especially if you’re not comfortable editing theme files directly. Many popular WordPress SEO plugins offer a dedicated field for Google Search Console verification. Here are a couple of popular options:
Using Yoast SEO Plugin
If you have the Yoast SEO plugin installed (a highly recommended SEO plugin for WordPress), follow these steps:
- In your WordPress dashboard, go to Yoast SEO > General.
- Switch to the Webmaster Tools tab.
- Find the “Google verification code” field.
- Paste only the code from the HTML tag provided by Google Search Console into this field. Do not paste the entire HTML tag, just the string of characters within the
content=""attribute. - Click “Save changes”.
Using All in One SEO Plugin
If you use the All in One SEO Pack plugin, here’s how to add the verification code:
- In your WordPress dashboard, go to All in One SEO > General Settings.
- Scroll down to the Webmaster Verification section.
- Find the “Google Search Console” field.
- Paste only the code from the HTML tag into this field (again, just the content value, not the entire tag).
- Click “Update Options”.
Step 6: Verify in Google Search Console
After adding the verification code using either the manual method or a plugin, go back to the Google Search Console verification page you kept open in Step 4.
Click the “Verify” button.
If you’ve correctly added the verification code, Google Search Console will confirm your website ownership, and you’ll be granted access to your Search Console dashboard.
Beyond Setup: Maximizing Google Search Console
Successfully registering your website with Google Search Console is just the beginning. To truly leverage its power, you should explore its various features and reports. Here are a few key actions to take after setup:
- Submit Your Sitemap: Submit your website’s sitemap to Google Search Console to help Google efficiently crawl and index your site’s content. If you use Yoast SEO or All in One SEO, they usually generate a sitemap for you, which you can find and submit in the “Sitemaps” section of Google Search Console.
- Regularly Monitor Performance Reports: Keep a close eye on the “Performance” reports to understand your website’s search traffic, keyword rankings, and identify opportunities for content optimization.
- Check for Coverage Issues: Use the “Coverage” report to identify any indexing errors and address them promptly.
- Explore Enhancements: Investigate the “Enhancements” section for reports on mobile usability, core web vitals, and other factors that impact user experience and SEO.
Website Speed and Hosting Considerations
While Google Search Console provides valuable tools for SEO, remember that website performance also plays a significant role in search ranking and user satisfaction. Website speed is a crucial ranking factor, and slow loading times can lead to higher bounce rates and lower search rankings.
Your choice of web hosting significantly impacts your website’s speed and overall performance. Investing in reliable and fast hosting is essential for a positive user experience and optimal SEO. Consider factors like server response time, uptime, and server location when choosing a hosting provider.
Conclusion
Setting up Google Search Console on your WordPress website is a fundamental step in managing and improving your website’s online presence. It provides essential data and tools to understand how Google sees your site, optimize your SEO efforts, and troubleshoot any issues that may hinder your search performance. By following this guide and actively utilizing Google Search Console’s features, you can significantly enhance your website’s visibility and reach a wider audience. Take the first step today and unlock the power of Google Search Console for your WordPress website!